MQ Client versioning

From the beginning, the protocol used by IBM MQ channels (queue manager and client channels) was designed to work any version to any version. You could have older clients talking to newer queue managers, and newer clients talking to older queue managers.

You could also have queue managers communicating even though they were all different versions too.

This works because at the beginning of a connection, the two partners negotiate what they are capable of doing, and use the lowest common denominator for this particular conversation. This does mean an older version cannot utilise features in the newer release, because it isn’t aware of their existence.

Any supported version and release of an IBM MQ client can connect to any supported version and release of an IBM MQ queue manager. The MQI channel is automatically configured to the latest version that both the client and server support. If the client and server are different versions, the client application must use only the functions in the earlier version.

IBM Docs: Compatibility between different versions of an IBM MQ client and a queue manager

Similar considerations about sticking to the lowest common denominator for the features you use apply the clustered queue managers and are covered here. I’ll stick to clients for the contents of this post.

Most of the time, as an MQ administrator, you are entirely unaware of what version of the protocol any particular channel connection is using, although it is exposed through channel exits where you can request the protocol version to be downgraded lower than the negotiation might have picked.

However, having a design for a protocol that works any to any version is not the end of the story. There is also the business of support. IBM only supports the more recent versions of IBM MQ. Each version of MQ, when released, has an expected life-span, and End of Support announcements are made when a version is nearing the end of its life-span. Testing of version to version compatibility is done by IBM, but not for every version to every version. You will be unsurprised to learn that IBM does not support the connection of a V5.0 client to a V9.3 queue manager, even if it does appear to work.

Moreover, there are considerations beyond just thinking about the protocol. For example, are all your SVRCONN channels configured to expect an SSL/TLS protected connection? This immediately puts your lowest client version at V5.3 (the release that introduced the SSL feature). Are you running a queue manager that has deprecated all the weaker CipherSpecs? If so, the oldest introduced TLS 1.2 CipherSpec that has not been deprecated was introduced at V7 (see the second table in Deprecated CipherSpecs), making that your lowest client version. In house security policies may raise this to even newer versions of the MQ client.

While making sure your client version isn’t out of support is advisable, it is also worth noting that generally speaking later versions of any software (with the possible exception of the most recent one!) are likely to be more stable and better performing with new features one can exploit. Upgrading software should not only be done because not doing so leaves you vulnerable. And to upgrade an IBM MQ client does not cost you any software purchasing dollars – yes, time and effort sure, but hard cash, no.

You may think, why bother? Old MQ clients DO still work, I’ve never had any problems, MQ’s backward compatibility has always been great. Well, past performance is not always indicative of future results. Sometimes fixes will break that compatibility. One such example was recently raised with APAR IT42945 – IBM MQ CVE-2023-28513 [CVSS base score 5.9] where the fix DID break old, out-of-support V5.2 and V5.3 Java clients. You can read more about that issue at here.

Whatever your reason to find, and upgrade, any back-level clients, the process to find them is the same. The client version is a piece of data that has had an increasingly visible journey. You may be aware that the version of the MQ client is something that is flowed across to the server. Originally it was just used to write out in trace for IBM Service; then it was added as output on DISPLAY CHSTATUS; and then in MQ V8.0.0.3 it was given to channel exits, and then in MQ V9.1.0, it was added to MQI accounting records. This latter location is the best place to pick it up because you can let the queue manager spot all the client connections and write out the data. You might miss a few if you just rely on using channel status.

When collecting the data about a client application that is using an old version of MQ, the most interesting information will be the application name and the IP address. This can help you locate the machine where the application is running in order to persuade the owner to upgrade the version of MQ used there.

MQEV can help you collect this information as we wrote about here.

MO71 display of MQEV collected Accounting MQI records for clients with different Remote Versions

Extra reading

The following links may also be useful when thinking about back-level clients, or trying to persuade application owners to upgrade.

How can I tell if my application is using Read Ahead?

The read-ahead feature of IBM MQ client applications has been around since WebSphere MQ V7.0.0. There are performance benefits to be gained when using it for certain types of applications. Those applications that use request and response type patterns, especially with many responses, such as those querying the IBM MQ Command Server are ideal candidates for it’s use. So how can you tell if you’re making use of this feature?

The simplest way to discover if the read ahead feature is being used when getting from queues over a client channel is to use the DISPLAY CONN command. You’re specifically interested in client channel connections, with queues that were opened for MQOO_INPUT_*.

Here’s a DISPLAY CONN command with some MQSCX command modifiers to keep the output neat and tidy. If you don’t use MQSCX, then you will just have to find the appropriate fields in the output.

DISPLAY CONN(*) TYPE(ALL) WHERE(CHANNEL NE ' ') -ALL +TYPE,APPLTAG,OBJNAME,READA,OPENOPTS
TYPE(CONN)                                                    APPLTAG(MQGem Software MQSCX)
TYPE(HANDLE) OBJNAME(MQSCX.MQGEMUSR.650BC2AF224A7A01) OPENOPTS(MQOO_INPUT_.....) READA(YES)
TYPE(CONN)                                                    APPLTAG(MQGem Software MO71)
TYPE(HANDLE) OBJNAME(MQMON.mqgemusr.650BC2AF224A7901) OPENOPTS(MQOO_INPUT_.....) READA(YES)
TYPE(CONN)                                                    APPLTAG(MQGem Software MQSCX)
TYPE(HANDLE) OBJNAME(SYSTEM.ADMIN.COMMAND.QUEUE)      OPENOPTS(MQOO_OUTPUT)      READA(NO)
TYPE(HANDLE) OBJNAME(MQSCX.MQGEMUSR.650BC2AF224A7A01) OPENOPTS(MQOO_OUTPUT)      READA(NO)
TYPE(CONN)                                                    APPLTAG(MQGem Software MO71)
TYPE(HANDLE) OBJNAME(MQMON.mqgemusr.650BC2AF224A7901) OPENOPTS(MQOO_OUTPUT.....) READA(NO)
TYPE(HANDLE) OBJNAME(SYSTEM.ADMIN.COMMAND.QUEUE)      OPENOPTS(MQOO_OUTPUT)      READA(NO)

Alternatively, if you want to view this output in a GUI, use the MO71 “Connection List”. Make sure the “Read Ahead” column is being displayed, and in this example I have filtered it to only show connections with a non-blank channel name.

MO71 Connection List dialog showing some Input Object handles with the Read Ahead feature in use

In both the above examples we can see that the Input Object handles were making use of the Read Ahead feature.

If you find that your application is not using Read Ahead for it’s Input object handles how can you discover why? There are various different ways that Read Ahead can be turned off.

  • Check the queue definition
    A queue definition has an attribute DEFREADA (Default Read Ahead) which has the expected YES and NO values, but also has a third value, DISABLED, which allows an administrator to over-ride the application’s choice to use Read Ahead. Make sure that the queue in question has DEFREADA(YES). In many cases where you are looking at a reply queue of some sort, remember that the setting in question is on the QMODEL definition.
  • Check the client channel
    In order to make use of the Read Ahead feature, the client channel must be used a full-duplex protocol across the network. This means that the SHARECNV value is important. Make sure it is set to a non-zero value to ensure it cannot cause Read Ahead to be switched off.
  • Check the application settings
    The application can control, to a certain extent (see first bullet), whether it wants to use Read Ahead or not. You can see whether it specifically requested Read Ahead or not by viewing the list of Open Options shown in your DISPLAY CONN output. I deliberately cropped it above, but here’s an example of one object handle using read ahead and one not using read ahead.

    OPENOPTS(MQOO_INPUT_EXCLUSIVE,MQOO_OUTPUT,MQOO_READ_AHEAD)
    OPENOPTS(MQOO_INPUT_EXCLUSIVE,MQOO_OUTPUT,MQOO_NO_READ_AHEAD)

    Clearly, if the application chooses to explicitly code MQOO_NO_READ_AHEAD then the Read Ahead feature will not be in use.

I hope that helps in understanding when the Read Ahead feature will be on and when it won’t be in use.

MQGem Tools TLS Configuration

This blog post is going to cover how to set up TLS secured client channels when using one of our command line tools, such as QLOAD, Q or MQSCX, to connect to your queue managers. Before I start, I just want to say up front that there is nothing special about how you do this. Our tools are all ‘C’ language MQI applications and so setting up TLS for them is just the same as setting it up for the IBM supplied ‘C’ language sample amqsputc as an example. If you know how to do that, then you know how to set it up for our command line tools.

If you want similar instructions for our GUI tools MO71 and MQEdit, please see this post.

MO71 TLS Connection to Queue Manager

Certificates

In order to have TLS secured connectivity between your MQGem tool and your queue manager, your queue manager must have a certificate, hopefully not a self-signed certificate; and you, the MQGem tool user, must also have a certificate identifying you. It is likely that this certificate identifying you will be used for connectivity from various different tools, so it does not need to be specific to the tool you are using. This blog post is not going to cover setting up the queue manager certificate as that has been amply covered in IBM Docs. What you need at your machine where you are running an MQGem tool is a signed certificate identifying you, and a copy of the CA certificate that signed the queue manager’s certificate. It is possible that you have several of the latter item depending on how your queue managers are setup. One hopes that you have many less of these than the number of queue managers you need to manage.

Key Database File

MQGem tools are ‘C’ language MQI applications. This means that the IBM MQ Client code expects it to use a KDB file with a matching named stashed file. Unlike Java programs, you do not provide the password to the certificate store (KDB file) anywhere, the IBM MQ Client code finds the stash file that contains the password due to the fact that it has the same name as the KDB file. Here is my set of files:-

 Directory of C:\MQGem

06/07/2021  16:43                88 MQGemClient.crl
06/07/2021  16:43            20,088 MQGemClient.kdb
06/07/2021  16:43                88 MQGemClient.rdb
06/07/2021  16:43               193 MQGemClient.sth
               4 File(s)         20,457 bytes

Later you will see when setting up your certificate configuration that you use the name up to, but not including, the file extension. The IBM MQ Client code can construct the name of the key repository and password stash file by appending the “.kdb” and “.sth” file extensions respectively.

As you follow the instructions in this blog post, you are going to create a number of files, the above KDB and associated ancillary files, a CCDT and an mqclient.ini file. It is useful to first create a directory to keep all these files together.

If you don’t already have a KDB file supplied for your use, you should create one now. Click on the twisty to see the details for each step that you need to do.

Step 1: Create a KDB file

IBM MQ supplies tools for you to create the files you need. In this case we show examples of using the command line tool runmqakm. There is also a GUI tool that can do the same job. Here is the command to create your KDB file. In my example, the KDB file (and accompanying stash file etc) will be created in the C:\MQGem directory, using names MQGemClient.* – you may wish to change this. In addition, you probably want a stronger password too!

runmqakm -keydb -create -db C:\MQGem\MQGemClient.kdb -pw passw0rd -type cms -stash

If you want, you can use the runmqakm tool to create a password for you:-

runmqakm -random -create -length 16 -strong

The KDB file, once created, is the place to put the various certificates you need. As mentioned above, you’ll need to have the CA certificate that signed your queue manager(s) certificates. This is so that the certificates coming from the queue managers at connection time can be validated by the IBM MQ Client as part of the TLS handshake.

If you have one or more files containing the CA certs to allow you to validate connections to your queue manager(s), add them to your KDB now. If you only have a single certificate file (a PKCS#12 file) that also contains the CA certs, skip Step 2.

Step 2: Add CA certificates to KDB

Here is the command to add a CA certificate to your KDB. As before, you are likely using a different location in your file system for the KDB file. Note that I am using the -stashed parameter from now on, so I never have to type in the password again. The label you use when you add a CA certificate doesn’t matter. Just make it something that is helpful in remembering what this certificate is. In my example MQGemProdCA is the label I have used for the production environment CA certificate.

runmqakm -cert -add -db C:\MQGem\MQGemClient.kdb -stashed -label MQGemProdCA -file MQGemProdCA.arm -format ascii -trust enable

Finally you need to have a certificate identifying you, the user of an MQGem tool. You may have been given a file already containing your signed certificate, and have to add that to your KDB, or you may need to generate a certificate request, get it signed by your company CA, and then when you get it back, receive it into the same KDB where you created the request. Choose either Step 3a or 3b below depending on how your company does this.

DO THIS: Step 3a: Add PKCS#12 private certificate into KDB

This special certificate file type is one that contains both your certificate and the private key for the certificate. It is very important to keep the private key safe, so when transporting this around in a PKCS#12 file, this particular type of file has a password. Other files that only contain certificates without private keys don’t have passwords.

Here is the command to add a PKCS#12 certificate file to your KDB. This command will also add the CA certificates that are in the file. Note that I am using the -stashed parameter for the KDB password, so I never have to type in the password again. The password on this command is the one that goes with the PKCS#12 file you have been given.

runmqakm -cert -import -file MoragCertificate.p12 -type pkcs12 -pw pkcs12passw0rd -target c:\MQGem\MQGemClient.kdb -stashed
OR THIS: Step 3b: Create a Certificate Request

To make a certificate request, issue the following command, using the KDB file that you just created.

runmqakm -certreq -create -db C:\MQGem\MQGemClient.kdb -stashed -label MQAdminProd -dn "CN=Morag Hughson,OU=Prod,O=MQGem Software" -file Clnt_Prod_Request.csr

Now send the certificate request file off to the CA that signs certificates for your environment. When you receive the signed certificate file back from them, receive it into the same KDB as before with the following command.

runmqakm -cert -receive -db C:\MQGem\MQGemClient.kdb -stashed -file Clnt_Prod_Signed.arm

As a final check that everything got added ok, list the contents of your KDB with the following command.

runmqakm -cert -list all -db C:\MQGem\MQGemClient.kdb -stashed

You should see output something like this. There should be at least one trusted certificate (shown with a !) and at least one personal certificate (shown with a -). You will need the label of the personal certificate when you come to set up your certificate configuration in a moment, so remember that.

5724-H72 (C) Copyright IBM Corp. 1994, 2020.
Certificates found
* default, - personal, ! trusted, # secret key
!       MQGemProdCA
-       MQAdminProd

Client-connection Channel

MQGem command line tools generally rely on the use of a Client Channel Definition Table (CCDT) to provide the client-connection channel definition details, rather than having lots of command line parameters to cover all the possible attributes. Use of a CCDT also makes it simpler to use the same channel definition details across a range of tools instead of having to specify the attributes individually for use with each tool. It is therefore a highly recommended method. If you don’t already have a CCDT with your client-connection channel details you should create one now.

Step 4: Create TLS-secured CLNTCONN channel in CCDT
In modern versions of IBM MQ, the CCDT can be created on the client machine using either runmqsc or our MQSCX tool, starting the tool with the -n flag to indicate you wish to create a CCDT.

Both runmqsc and MQSCX will pay attention to the MQCHLLIB and MQCHLTAB environment variables to determine the location where the CCDT file will be written. Additionally, MQSCX has a -t flag that you can use to specify the full path and file name you want instead.

If you want to use a JSON CCDT, MQSCX can be used to create one of those by using the -t flag. See Working with JSON CCDT files blog post for more details.

Once your MQSC tool of choice is running in CCDT mode, create the channel with a command like the following.

Your company may choose to use a different CipherSpec (the SSLCIPH) parameter. I have chosen to use the more recently introduced ANY_TLS12. If you can’t use one of the “ANY” values then you should ensure that the same value is used here, and in the SVRCONN channel (next step).

DEFINE CHANNEL(MQGEM.SVRCONN.TLS) CHLTYPE(CLNTCONN) TRPTYPE(TCP) CONNAME('GEMWIN3.mqgem.com(1701)') SSLCIPH(ANY_TLS12) QMNAME(MQG1)

Server-connection Channel

You’re also going to need to create a TLS-secured server-connection (SVRCONN) channel on the queue manager if you don’t already have one in place.

Step 5: Create TLS-secured SVRCONN channel
Here’s an example MQSC command to define such a channel. The name you use for your channel may well be different. Whatever it is, remember it for the next step.

Your company may choose to use a different CipherSpec (the SSLCIPH) parameter. I have chosen to use the more recently introduced ANY_TLS12. If you can’t use one of the “ANY” values then you should ensure that the same value is used here, and in the CLNTCONN channel (previous step).

DEFINE CHANNEL(MQGEM.SVRCONN.TLS) CHLTYPE(SVRCONN) TRPTYPE(TCP) SSLCIPH(ANY_TLS12) SSLCAUTH(REQUIRED)

mqclient.ini configuration

When setting things up outside of the MQGem tool itself, you can either use environment variables or the mqclient.ini file to point to all the various settings. We’ll be showing you the latter today. If you’re not familiar with why the mqclient.ini file is our recommendation, you might find this blog post interesting.

Step 6: Create mqclient.ini file
In your working directory where you have your KDB and CCDT files, create a text file with the name mqclient.ini. Edit this file to add the following contents.

Note the ‘.’ to mean “this directory” in the value for the ChannelDefinitionDirectory. Alternatively you can fully spell out your directory.

CHANNELS:
  ChannelDefinitionDirectory=.
  ChannelDefinitionFile=MQGEM.TAB
SSL:
  SSLKeyRepository=C:\MQGem\MQGemClient
  CertificateLabel=MQAdminProd

Test Connectivity

Now that you have your certificates set up, your client channel definition created, and your mqclient.ini file pulling all the information together, you can run your command line MQGem tool to pick up and use all these things you have configured.

The easiest way to do so is to ensure you are in the directory containing the mqclient.ini file before you run the command invocation. The IBM MQ client will pick up the mqclient.ini that is in the current directory by preference. However, if you want to do something different, this page shows all the different mechanisms.

Step 7: Run Q using TLS connection
From in your directory containing the mqclient.ini file, invoke Q with a command like the following.

The -l mqic flag tells Q to make a client connection rather than a locally bound connection, and the rest of the invocation is up to you. In our example we are just opening queue Q1 for output.

q -m MQG1 -l mqic -o Q1
Step 7: Run QLOAD using TLS connection
From in your directory containing the mqclient.ini file, invoke QLOAD with a command like the following.

The -l mqic flag tells QLOAD to make a client connection rather than a locally bound connection, and the rest of the invocation is up to you. In our example we are just browsing queue Q1 to a file.

qload -m MQG1 -l mqic -i Q1 -f q1.qld
Step 7: Run MQSCX using TLS connection
From in your directory containing the mqclient.ini file, invoke QLOAD with a command like the following.

The -l flag tells MQSCX to make a client connection rather than a locally bound connection.

mqscx -m MQG1 -l

If you receive an error when trying to connect, remember to use the client error log, found in <MQ_DATA_PATH>/errors/AMQERR01.LOG. Scroll to the bottom for the most recent error.

Summary

It is hoped that this post will help you set up TLS-secured connectivity between MQGem command line tools and your queue manager. Remember that the same KDB file and certificates will also work with the IBM-supplied samples such as amqsputc. If you have any issues, it may be helpful to try things out with that very simple sample first. It is also good advice if you get validation problems to change the SVRCONN channel to use SSLCAUTH(OPTIONAL) and get it working that way first. Once it does then go back to SSLCAUTH(REQUIRED) knowing that the problem is that you are either not sending, or the queue manager is not validating, the client side certificate.

If you have IBM MQ V9.3.0 (or later) as your client installation you can also now make use of a new feature in that release which allows you to avoid having a stash file. See this post for more details.

If you have situations where you are trying to set up TLS-secured connectivity for MQGem tools that are not covered in this post, please do get in touch, either in a comment below, or through any of the usual channels (see About page).

Using an API Exit with a ‘C’ client

API exits have been available to run in the ‘C’ client since IBM WebSphere MQ V7.1. This blog post will walk through the steps of setting up the IBM-supplied sample API exit, amqsaxe, for a client application.

In order to configure an API exit, we will need to have an mqclient.ini file.

  • On Windows, a sample version can be found in:-
    %MQ_INSTALLATION_PATH%\samp

    and there is also another example which can be found in the root of the :-

    %MQ_DATA_PATH%
  • On Linux, a sample version can be found in:-
    $MQ_INSTALLATION_PATH/samp

    and there is also another example which can be found in the root of the :-

    $MQ_DATA_PATH

Take a copy of this sample file as a starting point if you don’t already have an mqclient.ini file for your application.

Now we need to add the following stanza and attributes to the mqclient.ini file. This example has Windows syntax to locate the module. If you are on Linux, you will need to put the equivalent path $MQ_INSTALLATION_PATH/samp/bin/amqsaxe. Note that you cannot use environment variables like MQ_INSTALLATION_PATH in the ini file, it will need to be fully spelled out.

ApiExitLocal:
  Name=SampleApiExit
  Function=EntryPoint
  Module=E:\mqm9240\Tools\c\Samples\bin64\amqsaxe.dll
  Sequence=100

The Sequence number only becomes important if you have more than one exit in the system. For our purposes we just have to set it to some number.

The other thing to put into the mqclient.ini file is the connectivity details for your client application to use. This can be details to locate the CCDT, or just the equivalent data that you might put into an MQSERVER environment variable. Since we are using an mqclient.ini file, we should put all the information together in the same place. For more on this read: IBM MQ Little Gem #13: mqclient.ini. For simplicity of this demo, I have just added the following to my mqclient.ini file.

CHANNELS:
  ServerConnectionParms=MQGEM.SVRCONN/TCP/localhost(1701)

If I later need to change to using a CCDT, I just need to edit this file again.

For your client application to locate and use the mqclient.ini, there are several things you can do. These are well documented here, so I won’t repeat them. Today I will set the MQCLNTCF environment variable to point to my mqclient.ini file which is in my current directory.

  • On Windows:-
    set MQCLNTCF=%CD%\mqclient.ini
  • On Linux:-
    export MQCLNTCF=$PWD/mqclient.ini

And finally, the sample API exit needs to know where to write its log files, and the first part of the file names it will write, so I set the MQAPI_TRACE_LOGFILE environment variable it will look for.

  • On Windows:-
    set MQAPI_TRACE_LOGFILE=%CD%\logfiles\MqiTrace
  • On Linux:-
    export MQAPI_TRACE_LOGFILE=$PWD/logfiles/MqiTrace

Now I run my client application. Today I will be using the Q Program as a simple test application. I invoke it as follows to put a single message to Q1.

q -m MQG1 -l mqic -oQ1 -M"Hello World"

Now I look in my logfiles directory and I see that a file called "MqiTrace.10228.1.log" has been created. It is a simple text file which when viewed will have some logging information about each MQ API call that my client program invoked. Here’s a snippet.

--------------------------------------------------------------------------
MQOPEN
 BEFORE                    2022-02-22  23:06:31                      16852
           Hconn: (0000001C9FEFBC20) 0xC000006
  pObjDesc      : 0x0000001C9FEFBC28
          0000001C9FEFCC80:  4F442020 01000000 01000000 51310000  OD  ........Q1..
          0000001C9FEFCC90:  00000000 00000000 00000000 00000000  ................
          0000001C9FEFCCA0:  00000000 00000000 00000000 00000000  ................
          0000001C9FEFCCB0:  00000000 00000000 00000000 00000000  ................
          0000001C9FEFCCC0:  00000000 00000000 00000000 00000000  ................
          0000001C9FEFCCD0:  00000000 00000000 00000000 00000000  ................
          0000001C9FEFCCE0:  00000000 00000000 00000000 414D512E  ............AMQ.
          0000001C9FEFCCF0:  2A000000 00000000 00000000 00000000  *...............
          0000001C9FEFCD00:  00000000 00000000 00000000 00000000  ................
          0000001C9FEFCD10:  00000000 00000000 00000000 00000000  ................
          0000001C9FEFCD20:  00000000 00000000                    ........        
  Options       : 0x9FEFBCB8
  pHobj         : 0x9FEFBC38

I hope that’s a helpful walkthrough on how to use the Sample Api Exit with a IBM MQ ‘C’ client application.

Are you using any back-level clients?

We have a list of questions that MQEV can help you to answer. One of them is:-

  • What version of MQ client are connecting to my Queue Manager? Are any of them old and in need of an update?

In this post I want to show you how to answer that question. If you’re interested in WHY you might want to answer that question, read this post.

You may be aware that the version of the MQ client is something that is flowed across to the server. Originally it was just used to write out in trace for IBM Service; then it was added as output on DISPLAY CHSTATUS; and then in MQ V8.0.0.3 it was given to channel exits, and then in MQ V9.1.0, it was added to MQI accounting records.

Capturing this data using accounting records is an excellent way to do it because you donā€™t have to worry about missing connections from applications that are so short lived that you canā€™t catch them with a DISPLAY CHSTATUS command. An MQI accounting record is written for each application at disconnect time (explicit MQDISC or implicit), but also periodically every ACCTINT if the connection duration is long enough and the application is doing any MQI work.

To do this, you turn on MQI Accounting records, using the following MQSC command.

ALTER QMGR ACCTMQI(ON)

Then tell MQEV to monitor the accounting queue with the following MQEV command.

RESUME EVQ(SYSTEM.ADMIN.ACCOUNTING.QUEUE)

Then you will get data for each application that connects to your queue manager. At the start of each record of this type will be various identifying fields about the application. For example the application name, the channel name it connected across (assuming it is a client), and the connection name it came from. In addition you will see the remote product and remote version of the client.

MO71 display Accounting MQI records for clients with different Remote Versions

If you don’t have any reason to collect MQI accounting, apart from answering this question, you could simply raise an Alert when you see a client older than a certain level, and then discard the rest of the data. Here’s how you would do that in the mqev.mqx script.

*********************************************************************
* Function for processing an Accounting MQI message                 *
*********************************************************************
func MQEVAcctMQI()
  if (data.CHANNEL)
    if (data.RVERSION < "09020000")
      @AlertStr  = "Application: " + data.ACCTMQI + -
                 " from CONNAME: " + data.CONNAME + -
                 " has a back-level client version: " + data.RVERSION
      @AlertObj  = data.CHANNEL
      @AlertQMgr = data.EVQMGR
      ADD EVALERT TEXT('<@AlertStr>') CATEGORY(CLIENTVER) +
          EVOBJNAME('<@AlertObj>') EVOBJTYPE(CHANNEL)     +
          SEVERITY(WARN) EVQMGR('<@AlertQMgr>') REPLACE
    endif
  endif
  *******************************************************************
  * Discard the MQI data - I have got all I needed from it          *
  *******************************************************************
  _stream = "$null"
endfunc

MQEV alerts can be displayed using a GUI such as MO71 or a command line tool such as MQSCX. When using MO71, if the alert list dialog is open, it will be automatically refreshed every time a new alert is added since MO71 subscribes to a topic that gets a publication with every new alert. The use of REPLACE in the above script means that only one alert will be written for each unique client. So if the same client application connects 100s of times, there will still only be one alert. Once the administrator believes the back-level client has been upgraded, the alert can be deleted from MQEV, and should it appear again, you know the problem is not yet fixed.

MO71 list of MQEV Alerts showing some back-level clients

You can read more about MQEV Alerts in this blog post.


Read more about MQEV, and download a copy, from the MQEV Web Page. If you donā€™t have a licence and would like to try out MQEV before deciding whether to buy then send an email to support@mqgem.com and a 1-month trial licence will be sent to you.

MO71/MQEdit TLS Configuration

This blog post is going to cover how to set up TLS secured client channels when using MO71 or MQEdit to connect to your queue managers. Before I start, I just want to say up front that there is nothing special about how you do this. MO71 and MQEdit are ‘C’ language MQI applications and so setting up TLS for them is just the same as setting it up for the IBM supplied ‘C’ language sample amqsputc as an example. If you know how to do that, then you know how to set it up for MO71 and MQEdit.

If you want similar instructions for our command line tools QLOAD, Q and MQSCX, please see this post.

MO71 TLS Connection to Queue Manager

Certificates

In order to have TLS secured connectivity between MO71 or MQEdit and your queue manager, your queue manager must have a certificate, hopefully not a self-signed certificate; and you, the GUI user, must also have a certificate identifying you. It is likely that this certificate identifying you will be used for connectivity from various different tools, so it does not need to be specific to MO71 or MQEdit. This blog post is not going to cover setting up the queue manager certificate as that has been amply covered in IBM Docs. What you need at your MO71 or MQEdit machine is a signed certificate identifying you, and a copy of the CA certificate that signed the queue manager’s certificate. It is possible that you have several of the latter item depending on how your queue managers are setup. One hopes that you have many less of these than the number of queue managers you need to manage.

Key Database File

MO71 and MQEdit are a ‘C’ language MQI applications. This means that the IBM MQ Client code expects them to use a KDB file with a matching named stashed file. Unlike Java programs, you do not provide the password to the certificate store (KDB file) anywhere, the IBM MQ Client code finds the stash file that contains the password due to the fact that it has the same name as the KDB file. Here is my set of files:-

 Directory of C:\MQGem

06/07/2021  16:43                88 MQGemClient.crl
06/07/2021  16:43            20,088 MQGemClient.kdb
06/07/2021  16:43                88 MQGemClient.rdb
06/07/2021  16:43               193 MQGemClient.sth
               4 File(s)         20,457 bytes

Later you will see when configuring MO71 and MQEdit that you use the name up to, but not including, the file extension. The IBM MQ Client code can construct the name of the key repository and password stash file by appending the “.kdb” and “.sth” file extensions respectively.

If you don’t already have a KDB file supplied for your use, you should create one now. Click on the twisty to see the details for each step that you need to do.

Step 1: Create a KDB file

IBM MQ supplies tools for you to create the files you need. In this case we show examples of using the command line tool runmqakm. There is also a GUI tool that can do the same job. Here is the command to create your KDB file. In my example, the KDB file (and accompanying stash file etc) will be created in the C:\MQGem directory, using names MQGemClient.* – you may wish to change this. In addition, you probably want a stronger password too!

runmqakm -keydb -create -db C:\MQGem\MQGemClient.kdb -pw passw0rd -type cms -stash

If you want, you can use the runmqakm tool to create a password for you:-

runmqakm -random -create -length 16 -strong

The KDB file, once created, is the place to put the various certificates you need. As mentioned above, you’ll need to have the CA certificate that signed your queue manager(s) certificates. This is so that the certificates coming from the queue managers at connection time can be validated by the IBM MQ Client as part of the TLS handshake.

If you have one or more files containing the CA certs to allow you to validate connections to your queue manager(s), add them to your KDB now. If you only have a single certificate file (a PKCS#12 file) that also contains the CA certs, skip Step 2.

Step 2: Add CA certificates to KDB

Here is the command to add a CA certificate to your KDB. As before, you are likely using a different location in your file system for the KDB file. Note that I am using the -stashed parameter from now on, so I never have to type in the password again. The label you use when you add a CA certificate doesn’t matter. Just make it something that is helpful in remembering what this certificate is. In my example MQGemProdCA is the label I have used for the production environment CA certificate.

runmqakm -cert -add -db C:\MQGem\MQGemClient.kdb -stashed -label MQGemProdCA -file MQGemProdCA.arm -format ascii -trust enable

Finally you need to have a certificate identifying you, the user of MO71 or MQEdit. You may have been given a file already containing your signed certificate, and have to add that to your KDB, or you may need to generate a certificate request, get it signed by your company CA, and then when you get it back, receive it into the same KDB where you created the request. Choose either Step 3a or 3b below depending on how your company does this.

DO THIS: Step 3a: Add PKCS#12 private certificate into KDB

This special certificate file type is one that contains both your certificate and the private key for the certificate. It is very important to keep the private key safe, so when transporting this around in a PKCS#12 file, this particular type of file has a password. Other files that only contain certificates without private keys don’t have passwords.

Here is the command to add a PKCS#12 certificate file to your KDB. This command will also add the CA certificates that are in the file. Note that I am using the -stashed parameter for the KDB password, so I never have to type in the password again. The password on this command is the one that goes with the PKCS#12 file you have been given.

runmqakm -cert -import -file MoragCertificate.p12 -type pkcs12 -pw pkcs12passw0rd -target c:\MQGem\MQGemClient.kdb -stashed
OR THIS: Step 3b: Create a Certificate Request

To make a certificate request, issue the following command, using the KDB file that you just created.

runmqakm -certreq -create -db C:\MQGem\MQGemClient.kdb -stashed -label MQAdminProd -dn "CN=Morag Hughson,OU=Prod,O=MQGem Software" -file Clnt_Prod_Request.csr

Now send the certificate request file off to the CA that signs certificates for your environment. When you receive the signed certificate file back from them, receive it into the same KDB as before with the following command.

runmqakm -cert -receive -db C:\MQGem\MQGemClient.kdb -stashed -file Clnt_Prod_Signed.arm

As a final check that everything got added ok, list the contents of your KDB with the following command.

runmqakm -cert -list all -db C:\MQGem\MQGemClient.kdb -stashed

You should see output something like this. There should be at least one trusted certificate (shown with a !) and at least one personal certificate (shown with a -). You will need the label of the personal certificate when you come to configure MO71 or MQEdit in a moment, so remember that.

5724-H72 (C) Copyright IBM Corp. 1994, 2020.
Certificates found
* default, - personal, ! trusted, # secret key
!       MQGemProdCA
-       MQAdminProd

Server-connection Channel

Now that you have all the certificates put in place, you’re going to need to create a TLS-secured server-connection (SVRCONN) channel on the queue manager if you don’t already have one in place.

Step 4: Create TLS-secured SVRCONN channel
Here’s an example MQSC command to define such a channel. The name you use for your channel may well be different. Whatever it is, remember it for the next step.

Your company may choose to use a different CipherSpec (the SSLCIPH) parameter. I have chosen to use the more recently introduced ANY_TLS12. If you can’t use one of the “ANY” values then you will need to make sure that you use the same value that is in your SVRCONN when you come to configure MO71 or MQEdit in the next step.

DEFINE CHANNEL(MQGEM.SVRCONN.TLS) CHLTYPE(SVRCONN) TRPTYPE(TCP) SSLCIPH(ANY_TLS12) SSLCAUTH(REQUIRED)

MO71 and MQEdit configuration

Now you are ready to configure MO71 or MQEdit to connect securely to your queue manager. It is worth saying here that you can, if you want to, set them up just as you would set up the IBM supplied sample amqsputc. You could create a CCDT, and use the MQSSLKEYR and MQCERTLABL environment variables.

However, here we are going to configure MO71 and MQEdit by filing in the various fields in the Client configuration on the Location Dialog.

If you already have a location in MO71 or MQEdit for this queue manager that you just need to change to use TLS now, skip Step 5 and just open up the location dialog for your existing location and click on the Configured button to get to the Client Channel dialog.

Step 5: Add Location

Choose menu File>Add Location…

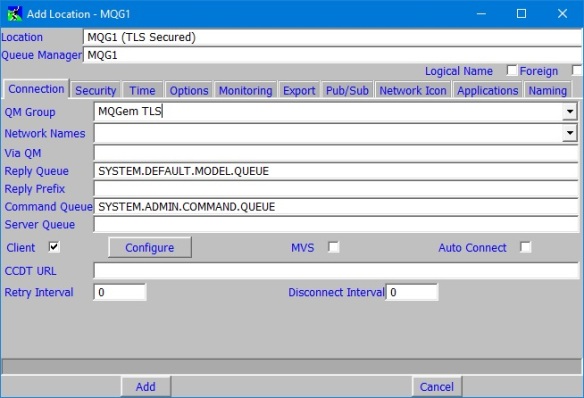
In the location dialog that appears, fill in a name for the Location; the Queue Manager name; put this location in a group if you are using them; check the Client box and you will find that the Configure button is now enabled to press. Pressing it will open up the client configuration dialog.

N.B. This screenshot shows the MO71 location dialog, but the MQEdit location dialog is very similar.

MO71 Location Dialog

Step 6: Client Configuration Dialog

In the Client Channel Definition dialog, make sure that you have the correct channel name, you may have to change it if you previously were connecting without TLS. Ensure you have a connection name filled in if you are making a new location here. If you are altering an existing one, there should be no change required as the same listening port is used for both clear and TLS connections. Choose a Cipher Spec that either matches what you have on the queue manager SVRCONN, or uses the same protocol that is requested. I have ANY_TLS12 on the SVRCONN so I have chosen a TLS1.2 Cipher Spec. You can see which Cipher Specs use which protocol on this handy page in IBM Docs.

Once you have selected a Cipher Spec, the dialog will show you the other SSL/TLS related fields. Fill in the Key Repository remembering not to include the extension of the file as discussed earlier. And fill in the Certificate Label that you took note of earlier.

MO71 Location Dialog Client Channel

Now click on OK on this dialog and if you just created a brand new location remember to click Add on the location dialog.

Step 7: Test Connectivity

The easiest way to test your newly configured connectivity is from the Location dialog. If you just added it as a new location, you will have to reopen the location dialog by right-clicking on the queue manager in the list on the main window and choosing Open Location.

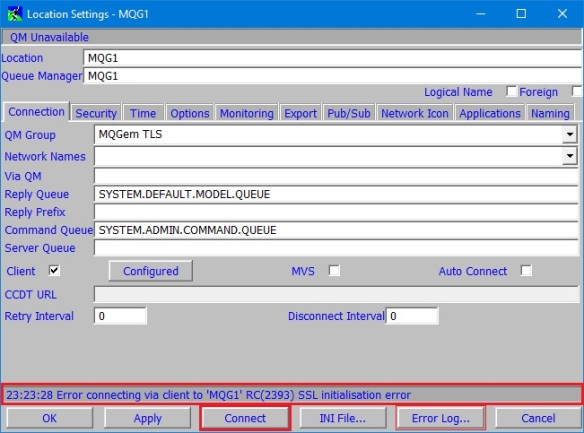
Use the Connect button first. Look in the Status bar at the bottom for any error messages and if you get an error message, use the Error Log… button to quickly bring up the client error log for more details about the error – remember to scroll to the bottom.

This screenshot shows the MO71 location dialog, but MQEdit V9.3.3 now has the same Connect/Disconnect, and Error Log… buttons.

MO71 Location Dialog

If the Connect button changes to Disconnect and the top of the dialog now says “[Connected]” then you have successfully connected MO71 or MQEdit over TLS and you are good to go! From now on all TCP/IP traffic over this client connection is secure.

Summary

It is hoped that this post will help you set up TLS-secured connectivity between the MO71 and MQEdit programs and your queue manager. Remember that the same KDB file and certificates will also work with the IBM-supplied samples such as amqsputc. If you have any issues, it may be helpful to try things out with that very simple sample first. It is also good advice if you get validation problems to change the SVRCONN channel to use SSLCAUTH(OPTIONAL) and get it working that way first. Once it does then go back to SSLCAUTH(REQUIRED) knowing that the problem is that you are either not sending, or the queue manager is not validating, the client side certificate.

If you have IBM MQ V9.3.0 (or later) as your client installation you can also now make use of a new feature in that release which allows you to avoid having a stash file. See this post for more details.

There are a few considerations about multiple environments, e.g. Test vs Production, that I would like to cover, but this post is already quite long, so I will write another post about that and link it in here once complete.

If you have situations where you are trying to set up TLS-secured connectivity for MO71 or MQEdit that are not covered in this post, please do get in touch, either in a comment below, or through any of the usual channels (see About page).

Working with JSON CCDT files

A recent feature added to IBM MQ are Client Channel Definition Table (CCDT) files in JSON format.

One of the features of MQSCX is to work with CCDT files, both the binary format, and now (since MQSCX V9.2.0) the JSON format.

With MQSCX you can display or create/alter a JSON CCDT file using familiar MQSC commands. Your tried and tested scripts for creating binary format CCDT files, can be used to create the same in JSON format.

For example, this file:

DEFINE CHANNEL(MQG1.SVRCONN) CHLTYPE(CLNTCONN) +
       CONNAME('gemmvs(1701)') QMNAME(MQG1)
DEFINE CHANNEL(MQG2.SVRCONN) CHLTYPE(CLNTCONN) +
       CONNAME('gemmvs(1702)') QMNAME(MQG2)

ClientChls.mqs

Run with this command:

mqscx -j -i ClientChls.mqs

Will produce a JSON CCDT file like this where the MQCHLLIB and MQCHLTAB environment variables point:

ClientChls.json
{
  "channel":
  [
    {
      "name": "MQG1.SVRCONN",
      "type": "clientConnection",
      "clientConnection":
      {
        "connection": 
        [
          {
            "host": "gemmvs",
            "port": 1701
          }
        ],
        "queueManager": "MQG1"
      }
    },
    {
      "name": "MQG2.SVRCONN",
      "type": "clientConnection",
      "clientConnection":
      {
        "connection": 
        [
          {
            "host": "gemmvs",
            "port": 1702
          }
        ],
        "queueManager": "MQG2"
      }
    }
  ]
}

You can also use MQSCX interactively and type in these familiar MQSC commands, using TAB auto-complete to assist, and create a JSON CCDT that way too.

Validation

One of the benefits of using a JSON format CCDT is that it is a text file instead of the proprietary binary file. So why do you need a tool like MQSCX to create one? Well the answer is validation. If you create a JSON CCDT file by hand, you may have a typo or spelling error in any of the field names. If you do this and display your file using runmqsc, or run it using an MQ Client, neither will inform you of your typo because they are designed to be future proof. There is no versioning on a JSON CCDT file, so if the MQ Client uses one that is from a newer version of MQ, it just ignores anything that it doesn’t recognise. This includes your misspelled attributes, that you actually wanted it to use!

Misspelled attributes

Here’s an example JSON CCDT with a typo:

{
  "channel":
  [
    {
      "name": "MQGEM.SVRCONN",
      "type": "clientConnection",
      "clientConnection":
      {
        "connection":
        [
          {
            "host": "localhost",
            "port": 1701
          }
        ]
      },
      "connectionManagement":
      {
         "hbInterval": 60
      }
    }
  ]
}

HBintClnt.json

If I use runmqsc to look at it, it won’t complain and it will tell me that my heartbeat interval value is 300.

Note: runmqsc can be used to display the contents of the JSON CCDT file, but not to create or edit its contents.

runmqsc -n
5724-H72 (C) Copyright IBM Corp. 1994, 2019.
Starting local MQSC for 'HBintClnt.json'.
DISPLAY CHANNEL(*) HBINT
     1 : DISPLAY CHANNEL(*) HBINT
AMQ8414I: Display Channel details.
   CHANNEL(MQGEM.SVRCONN)                  CHLTYPE(CLNTCONN)
   HBINT(300) 

With a SVRCONN defined with HBINT(60), a client running using this CCDT, which should be using 60 seconds for the heartbeat interval, will actually use 300, and so the running SVRCONN will end up with 300 as well.

AMQ8417I: Display Channel Status details.
   CHANNEL(MQGEM.SVRCONN)                  CHLTYPE(SVRCONN)
   CONNAME(127.0.0.1)                      CURRENT
   HBINT(300)                              STATUS(RUNNING)
   SUBSTATE(RECEIVE)                    

Running MQSCX to look at this JSON CCDT file, will show the following:

MQSCX Extended MQSC Program – Version 9.2.0

At line 20 of file ‘C:\MQGem\HBintClnt.json’, unrecognised field name ‘hbInterval’ found

CCDT file ‘C:\MQGem\HBintClnt.json’, 1 channels read

Licenced to Paul Clarke

Licence Location: Head Office

So, you are immediately aware of the issue in your CCDT file.

Missing mandatory attributes

There aren’t many mandatory attributes on a client channel definition, but those that are, are important!

If you omit a mandatory attribute, again runmqsc won’t complain, but of course the client channel will when it tries to make a connection.

Here’s an example JSON CCDT with a channel that hasn’t specified a connection name:

{
  "channel":
  [
    {
      "name": "MQGEM.SVRCONN",
      "type": "clientConnection",
    }
  ]
}

ConnameClnt.json

When a client application attempts to run using this, you’ll get something like the following in your client AMQERR01.LOG:

AMQ9203E: A configuration error for TCP/IP occurred.

EXPLANATION:
Error in configuration for communications to host ' '.  Allocation of
a TCP/IP conversation to host ' ' was not possible.

Running MQSCX to view, and therefore validate, this JSON CCDT file, will show the following:

MQSCX Extended MQSC Program – Version 9.2.0

The channel definition ending at line 7 of file ‘C:\MQGem\ConnameClnt.json’ has not specified a connection name

CCDT file ‘C:\MQGem\ConnameClnt.json’, 1 channels read

Licenced to Paul Clarke

Licence Location: Head Office

Enhanced Filtering

In addition to the above, using MQSCX to view and manipulate your CCDTs (both binary and JSON) allows you to utilise the power of MQSCX filtering. For example you can use a command like the following, which wouldn’t be allowed through runmqsc.

DISPLAY CHANNEL(*MQGEM*)

Or you could use enhanced WHERE clauses that are more powerful than the IBM MQ supplied WHERE clause. For example, you can use a command like the following:

DISPLAY CHANNEL(*) =WHERE(NOT(SCYEXIT AND SCYDATA))

Re-ordering your JSON defined channels

The order that an MQ client will pick channels to use from your JSON CCDT is dependant on the order they are in the file, and you control that order. In the binary CCDT, the file was always internally ordered alphabetically, but with a text file like the JSON CCDT you are in complete control.

As it is a text file, you can just use your favourite editor to copy the lines around, just make sure you have all the right brackets and commas in place. Alternatively, you can use MQSCX to reorder your file just how you want it as follows.

MOVE CHANNEL(MQG1.SVRCONN) POSITION(1) NEWPOS(2)

You can also indicate the position in the file for a channel definition at the time you create it, for example, using a command like this to make the new channel first in the file:

DEFINE CHANNEL(MQG1.SVRCONN) CHLTYPE(CLNTCONN) +
       CONNAME('gemmvs(1701)') QMNAME(MQG1) INDEX(BEFORE)

JSON file format

You also have some control over the contents of the JSON CCDT file that is created by MQSCX with three options on how the fields are output.

  • =set jsonfields(all)
    This option will create a JSON CCDT file with all the values output, even those that just contain the default or blank values. This makes your JSON CCDT file bigger of course, but might be useful if you need to manually edit it later and you are unsure of the field names.
  • =set jsonfields(date)
    This option will create a JSON CCDT file with the minimum set of fields (see below) and additionally the alteration date/time field. The MQ Client does not make use the of this date information, so it is only added if you ask for it. We assume, since it is in the JSON CCDT schema that someone might want it for something.
  • =set jsonfields(min)
    This is the default setting, and only outputs the channel fields are have non-default or non-blank values. This will make your JSON CCDT file much smaller than you would get with jsonfields(all), and is the minimum the MQ Client needs to work with.

Summary

So if you’re starting to look into using JSON CCDT files, perhaps for their ability to define channels with the same name within one CCDT, and you’re not a JSON format expert, take a look at MQSCX to produce your CCDTs and ensure that you always have a valid format CCDT file to use with your MQ Clients.


If you don’t already have MQSCX and you’d like to try it out, please email support@mqgem.com to request a trial licence. You can download MQSCX from our website.

Announcing Q from MQGem

SupportPac MA01 was written by Paul Clarke back in June 1995. It was one of the first SupportPacs for MQ as you can tell by its number. Paul wrote it because the amqsput, amqsget and amqsbcg samples didn’t give him the flexibility he wanted. It became a very handy tool in the pocket of many an MQ administrator over the years.

When Paul left IBM to form MQGem Software, the MA01 SupportPac was discontinued, and it’s source code put on GitHub for anyone who wanted to build it and run it themselves. However, many MQ users don’t want the complication and expense of looking after home-built tools, and would prefer a fully supported product. As such, a few of our customers have asked whether we would be willing to continue to maintain and enhance the Q program, and so here it is.

Q program pocket knife

A veritable pocket knife of features

The Q program from MQGem has moved on a little from the last version that was the MA01 SupportPac, after all we’ve continued to use it as a very helpful tool here inside MQGem Software. Some of the new features are:-

  • IBM MQ Multi-version Support
    Q will load the MQ libraries from the place identified by setmqenv.
  • New help features
    To make it easier to find the option you are looking for since the Q program does have a lot of flags!.
  • Message formatters added
    Formatters for JSON, EDIFACT, CSV and FIX message formats have been added.
  • Character substitution
    This will display text such as &gt; as the character ‘>’.
  • 64-bit executable
    The Q program is now 64-bit across all platforms.
  • Minor flag enhancements
    1. The special message format string which starts with the ‘#’ character previously had a 40 character limit. This has been lifted.
    2. MQRO_PASS_CORREL_ID has been added to the confirm options on the -n flag as -n[passc].
    3. You can use -dt to print out the offsets of a message
    4. The prompt menu used by -xc to set various client connection channel settings such as TLS and exits has been updated to only request valid exits for a client channel, and to use a more modern CipherSpec by default.
    5. The use of truncation on an MQGET has been made safer by requiring the user explicitly select MQGMO_ACCEPT_TRUNCATED_MESSAGE when using the -=> flag by using the optional ‘t‘ flag, to give -=t<length>.
    6. The Commit interval (-p) flag has been extended to also take an optional commit interval after which an incomplete transaction, that is one that has not reached the requested total number of messages, will be committed anyway.
    7. The subscribe call created with the -S flag can be additionally configured to use MQSO_SET_CORREL_ID by using the -gc:CorrelId flag.
  • Flags renamed
    Some minor flags have been renamed to improve usability and consistency. These are listed in full in the User Guide. The majority of the flags are exactly the same as they were in the Support Pac.

Even if you don’t intend to purchase a licence, you may find value in downloading the user guide. At long last we have a manual for Q! As we said above, the parameters are not absolutely identical to the SupportPac, but the majority are the same, and the vast majority of the manual is still applicable to the SupportPac. You may well discover features you never knew that Q had.


Read more about the new product, and download a copy, from the Q Web Page. If you would like to try out MQGem’s Q program before deciding whether to buy then send an email to support@mqgem.com and a 1-month trial licence will be sent to you.

Behaviour changes in MQ V9.0.4 – CONNAUTH/CHLAUTH

UserID and PasswordIBM recently released it’s latest Continuous Delivery release (MQ V9.0.4). This has made some changes to the default behaviours for CONNAUTH and CHLAUTH. You can read all the new changes in V9.0.4 here, but I wanted to highlight a few I thought were very important.

Adopt Context is YES by default

From the introduction of Connection Authentication in IBM MQ V8, the default value of ADOPTCTX was NO. I am delighted to see that the default has now been changed to YES. This is probably the most common configuration problem we help customers with around the use of Connection Authentication. It’ll take a while to percolate through, because there are plenty of existing queue managers out there with ADOPTCTX(NO) but it will definitely improve things.

qm.ini ChlauthEarlyAdopt=Y is now the default

The qm.ini ChlauthEarlyAdopt attribute was added in IBM MQ V8 FixPack 5 to allow users to revert the behaviour back to the way it was prior to another change that was made – i.e. back to the designed IBM MQ V8 GA behaviour. I am very happy to see that IBM has now reverted this behaviour to be there by default for everyone.

Java clients use user ID and password in the same way as ‘C’ clients

Due to the historical use by the Java client of the FAP flow to send a user ID and password (as described in this blog post) a compatibility setting had to be provided at MQ V8 GA in case any Java Client connections into queue managers were relying on this behaviour for their security exits. This meant that Java clients and ‘C’ Clients operated differently by default. Now, as of V9.0.4, the Java client uses the MQCSP to send its user ID and password just as the ‘C’ client does and they both work the same way. This is very good news.

Creating a CCDT for any version

You may have read an earlier post where we described being able to determine what version of CCDT you had in your hand.

CCDT Version

How often have you had a CCDT file in your hand and wondered what version it was and whether you can give it to some of your known back-level client machines to use.

MQSCX can help you determine this. Open up your CCDT using the mqscx -n mode and then you can quite simply display the version number of all your client channels therein.

What you may not have realised from that post however, was that not only can MQSCX help to investigate what version number your CCDT is made for, it can also make a CCDT for the correct version as well. If you have back-level clients, it can be a real pain having to keep a queue manager of the same level around just to be able to create a CCDT that it will understand. Well, you can ditch that queue manager and use MQSCX instead. It’s really easy to do as well.

To use MQSCX to work with a CCDT, you need to use the -n parameter. This will then look for the CCDT file in the location specified by the MQCHLLIB and MQCHLTAB environment variables unless you provide the -t parameter to give it a specific file name. If one doesn’t exist, it will make a new one for you, and if one does exist it will read it and allow you to update it. In order to control the version of CCDT you are creating, you should additionally use the -V parameter which allows you to specify the version the CCDT file should be written as.

Here’s an example, run the MQSCX program like this:

mqscx -n -t C:\MQGem\CCDT\MQGEM.TAB -V7.0

And then you can use it to make DISPLAY, ALTER and DELETE commands.

MQSCX Extended MQSC Program – Version 8.0.0

CCDT commands directed to file ‘C:\MQGem\CCDT\MQGEM.TAB’

Licenced to Paul Clarke

Licence Location: Head Office

[12:02:10] DISPLAY CHANNEL(*) CONNAME VERSION

_________________________________________________

CHANNEL(MQG1.SVRCONN) CHLTYPE(CLNTCONN)

CONNAME(win12.mqgem.com(1602)) VERSION(8.0)

_________________________________________________

CHANNEL(MQG2.SVRCONN) CHLTYPE(CLNTCONN)

CONNAME(aix5.mqgem.com(4231)) VERSION(8.0)

_________________________________________________

CHANNEL(MQG3.SVRCONN) CHLTYPE(CLNTCONN)

CONNAME(mvs1.mqgem.com(1255)) VERSION(8.0)

_________________________________________________

Total display responses – Received:3

>

As you can see, at the moment all the channels in this CCDT are at V8.0 which means my V7.0 client won’t be able to read them. I need to make a change to each record to ensure MQSCX will write it out at version V7.0 as I have indicated on my start command. Helpfully, I can do that in one single command:-

ALTER CHANNEL(*)

This makes no actual change to the attributes of the channel definition, but does ‘touch’ each record to ensure that it gets the new version. Displaying the records again as above will show that the version number for each channel mentioned by the ALTER command (in this example all of them), now indicates it is at version V7.0, just what my back-level client application needs.

Exiting MQSCX and re-running it will show you that this earlier version of the CCDT has indeed been hardened.

Note that if you had been using some attributes introduced in later versions than V7.0, this information would be lost when altering the channel definition to be an earlier version.


If you’d like to try out MQSCX, please email support@mqgem.com to request a trial licence.