MQGem Tools TLS Configuration

This blog post is going to cover how to set up TLS secured client channels when using one of our command line tools, such as QLOAD, Q or MQSCX, to connect to your queue managers. Before I start, I just want to say up front that there is nothing special about how you do this. Our tools are all ‘C’ language MQI applications and so setting up TLS for them is just the same as setting it up for the IBM supplied ‘C’ language sample amqsputc as an example. If you know how to do that, then you know how to set it up for our command line tools.

If you want similar instructions for our GUI tools MO71 and MQEdit, please see this post.

MO71 TLS Connection to Queue Manager

Certificates

In order to have TLS secured connectivity between your MQGem tool and your queue manager, your queue manager must have a certificate, hopefully not a self-signed certificate; and you, the MQGem tool user, must also have a certificate identifying you. It is likely that this certificate identifying you will be used for connectivity from various different tools, so it does not need to be specific to the tool you are using. This blog post is not going to cover setting up the queue manager certificate as that has been amply covered in IBM Docs. What you need at your machine where you are running an MQGem tool is a signed certificate identifying you, and a copy of the CA certificate that signed the queue manager’s certificate. It is possible that you have several of the latter item depending on how your queue managers are setup. One hopes that you have many less of these than the number of queue managers you need to manage.

Key Database File

MQGem tools are ‘C’ language MQI applications. This means that the IBM MQ Client code expects it to use a KDB file with a matching named stashed file. Unlike Java programs, you do not provide the password to the certificate store (KDB file) anywhere, the IBM MQ Client code finds the stash file that contains the password due to the fact that it has the same name as the KDB file. Here is my set of files:-

 Directory of C:\MQGem

06/07/2021  16:43                88 MQGemClient.crl
06/07/2021  16:43            20,088 MQGemClient.kdb
06/07/2021  16:43                88 MQGemClient.rdb
06/07/2021  16:43               193 MQGemClient.sth
               4 File(s)         20,457 bytes

Later you will see when setting up your certificate configuration that you use the name up to, but not including, the file extension. The IBM MQ Client code can construct the name of the key repository and password stash file by appending the “.kdb” and “.sth” file extensions respectively.

As you follow the instructions in this blog post, you are going to create a number of files, the above KDB and associated ancillary files, a CCDT and an mqclient.ini file. It is useful to first create a directory to keep all these files together.

If you don’t already have a KDB file supplied for your use, you should create one now. Click on the twisty to see the details for each step that you need to do.

Step 1: Create a KDB file

IBM MQ supplies tools for you to create the files you need. In this case we show examples of using the command line tool runmqakm. There is also a GUI tool that can do the same job. Here is the command to create your KDB file. In my example, the KDB file (and accompanying stash file etc) will be created in the C:\MQGem directory, using names MQGemClient.* – you may wish to change this. In addition, you probably want a stronger password too!

runmqakm -keydb -create -db C:\MQGem\MQGemClient.kdb -pw passw0rd -type cms -stash

If you want, you can use the runmqakm tool to create a password for you:-

runmqakm -random -create -length 16 -strong

The KDB file, once created, is the place to put the various certificates you need. As mentioned above, you’ll need to have the CA certificate that signed your queue manager(s) certificates. This is so that the certificates coming from the queue managers at connection time can be validated by the IBM MQ Client as part of the TLS handshake.

If you have one or more files containing the CA certs to allow you to validate connections to your queue manager(s), add them to your KDB now. If you only have a single certificate file (a PKCS#12 file) that also contains the CA certs, skip Step 2.

Step 2: Add CA certificates to KDB

Here is the command to add a CA certificate to your KDB. As before, you are likely using a different location in your file system for the KDB file. Note that I am using the -stashed parameter from now on, so I never have to type in the password again. The label you use when you add a CA certificate doesn’t matter. Just make it something that is helpful in remembering what this certificate is. In my example MQGemProdCA is the label I have used for the production environment CA certificate.

runmqakm -cert -add -db C:\MQGem\MQGemClient.kdb -stashed -label MQGemProdCA -file MQGemProdCA.arm -format ascii -trust enable

Finally you need to have a certificate identifying you, the user of an MQGem tool. You may have been given a file already containing your signed certificate, and have to add that to your KDB, or you may need to generate a certificate request, get it signed by your company CA, and then when you get it back, receive it into the same KDB where you created the request. Choose either Step 3a or 3b below depending on how your company does this.

DO THIS: Step 3a: Add PKCS#12 private certificate into KDB

This special certificate file type is one that contains both your certificate and the private key for the certificate. It is very important to keep the private key safe, so when transporting this around in a PKCS#12 file, this particular type of file has a password. Other files that only contain certificates without private keys don’t have passwords.

Here is the command to add a PKCS#12 certificate file to your KDB. This command will also add the CA certificates that are in the file. Note that I am using the -stashed parameter for the KDB password, so I never have to type in the password again. The password on this command is the one that goes with the PKCS#12 file you have been given.

runmqakm -cert -import -file MoragCertificate.p12 -type pkcs12 -pw pkcs12passw0rd -target c:\MQGem\MQGemClient.kdb -stashed
OR THIS: Step 3b: Create a Certificate Request

To make a certificate request, issue the following command, using the KDB file that you just created.

runmqakm -certreq -create -db C:\MQGem\MQGemClient.kdb -stashed -label MQAdminProd -dn "CN=Morag Hughson,OU=Prod,O=MQGem Software" -file Clnt_Prod_Request.csr

Now send the certificate request file off to the CA that signs certificates for your environment. When you receive the signed certificate file back from them, receive it into the same KDB as before with the following command.

runmqakm -cert -receive -db C:\MQGem\MQGemClient.kdb -stashed -file Clnt_Prod_Signed.arm

As a final check that everything got added ok, list the contents of your KDB with the following command.

runmqakm -cert -list all -db C:\MQGem\MQGemClient.kdb -stashed

You should see output something like this. There should be at least one trusted certificate (shown with a !) and at least one personal certificate (shown with a -). You will need the label of the personal certificate when you come to set up your certificate configuration in a moment, so remember that.

5724-H72 (C) Copyright IBM Corp. 1994, 2020.
Certificates found
* default, - personal, ! trusted, # secret key
!       MQGemProdCA
-       MQAdminProd

Client-connection Channel

MQGem command line tools generally rely on the use of a Client Channel Definition Table (CCDT) to provide the client-connection channel definition details, rather than having lots of command line parameters to cover all the possible attributes. Use of a CCDT also makes it simpler to use the same channel definition details across a range of tools instead of having to specify the attributes individually for use with each tool. It is therefore a highly recommended method. If you don’t already have a CCDT with your client-connection channel details you should create one now.

Step 4: Create TLS-secured CLNTCONN channel in CCDT
In modern versions of IBM MQ, the CCDT can be created on the client machine using either runmqsc or our MQSCX tool, starting the tool with the -n flag to indicate you wish to create a CCDT.

Both runmqsc and MQSCX will pay attention to the MQCHLLIB and MQCHLTAB environment variables to determine the location where the CCDT file will be written. Additionally, MQSCX has a -t flag that you can use to specify the full path and file name you want instead.

If you want to use a JSON CCDT, MQSCX can be used to create one of those by using the -t flag. See Working with JSON CCDT files blog post for more details.

Once your MQSC tool of choice is running in CCDT mode, create the channel with a command like the following.

Your company may choose to use a different CipherSpec (the SSLCIPH) parameter. I have chosen to use the more recently introduced ANY_TLS12. If you can’t use one of the “ANY” values then you should ensure that the same value is used here, and in the SVRCONN channel (next step).

DEFINE CHANNEL(MQGEM.SVRCONN.TLS) CHLTYPE(CLNTCONN) TRPTYPE(TCP) CONNAME('GEMWIN3.mqgem.com(1701)') SSLCIPH(ANY_TLS12) QMNAME(MQG1)

Server-connection Channel

You’re also going to need to create a TLS-secured server-connection (SVRCONN) channel on the queue manager if you don’t already have one in place.

Step 5: Create TLS-secured SVRCONN channel
Here’s an example MQSC command to define such a channel. The name you use for your channel may well be different. Whatever it is, remember it for the next step.

Your company may choose to use a different CipherSpec (the SSLCIPH) parameter. I have chosen to use the more recently introduced ANY_TLS12. If you can’t use one of the “ANY” values then you should ensure that the same value is used here, and in the CLNTCONN channel (previous step).

DEFINE CHANNEL(MQGEM.SVRCONN.TLS) CHLTYPE(SVRCONN) TRPTYPE(TCP) SSLCIPH(ANY_TLS12) SSLCAUTH(REQUIRED)

mqclient.ini configuration

When setting things up outside of the MQGem tool itself, you can either use environment variables or the mqclient.ini file to point to all the various settings. We’ll be showing you the latter today. If you’re not familiar with why the mqclient.ini file is our recommendation, you might find this blog post interesting.

Step 6: Create mqclient.ini file
In your working directory where you have your KDB and CCDT files, create a text file with the name mqclient.ini. Edit this file to add the following contents.

Note the ‘.’ to mean “this directory” in the value for the ChannelDefinitionDirectory. Alternatively you can fully spell out your directory.

CHANNELS:
  ChannelDefinitionDirectory=.
  ChannelDefinitionFile=MQGEM.TAB
SSL:
  SSLKeyRepository=C:\MQGem\MQGemClient
  CertificateLabel=MQAdminProd

Test Connectivity

Now that you have your certificates set up, your client channel definition created, and your mqclient.ini file pulling all the information together, you can run your command line MQGem tool to pick up and use all these things you have configured.

The easiest way to do so is to ensure you are in the directory containing the mqclient.ini file before you run the command invocation. The IBM MQ client will pick up the mqclient.ini that is in the current directory by preference. However, if you want to do something different, this page shows all the different mechanisms.

Step 7: Run Q using TLS connection
From in your directory containing the mqclient.ini file, invoke Q with a command like the following.

The -l mqic flag tells Q to make a client connection rather than a locally bound connection, and the rest of the invocation is up to you. In our example we are just opening queue Q1 for output.

q -m MQG1 -l mqic -o Q1
Step 7: Run QLOAD using TLS connection
From in your directory containing the mqclient.ini file, invoke QLOAD with a command like the following.

The -l mqic flag tells QLOAD to make a client connection rather than a locally bound connection, and the rest of the invocation is up to you. In our example we are just browsing queue Q1 to a file.

qload -m MQG1 -l mqic -i Q1 -f q1.qld
Step 7: Run MQSCX using TLS connection
From in your directory containing the mqclient.ini file, invoke QLOAD with a command like the following.

The -l flag tells MQSCX to make a client connection rather than a locally bound connection.

mqscx -m MQG1 -l

If you receive an error when trying to connect, remember to use the client error log, found in <MQ_DATA_PATH>/errors/AMQERR01.LOG. Scroll to the bottom for the most recent error.

Summary

It is hoped that this post will help you set up TLS-secured connectivity between MQGem command line tools and your queue manager. Remember that the same KDB file and certificates will also work with the IBM-supplied samples such as amqsputc. If you have any issues, it may be helpful to try things out with that very simple sample first. It is also good advice if you get validation problems to change the SVRCONN channel to use SSLCAUTH(OPTIONAL) and get it working that way first. Once it does then go back to SSLCAUTH(REQUIRED) knowing that the problem is that you are either not sending, or the queue manager is not validating, the client side certificate.

If you have IBM MQ V9.3.0 (or later) as your client installation you can also now make use of a new feature in that release which allows you to avoid having a stash file. See this post for more details.

If you have situations where you are trying to set up TLS-secured connectivity for MQGem tools that are not covered in this post, please do get in touch, either in a comment below, or through any of the usual channels (see About page).

MO71/MQEdit TLS Configuration

This blog post is going to cover how to set up TLS secured client channels when using MO71 or MQEdit to connect to your queue managers. Before I start, I just want to say up front that there is nothing special about how you do this. MO71 and MQEdit are ‘C’ language MQI applications and so setting up TLS for them is just the same as setting it up for the IBM supplied ‘C’ language sample amqsputc as an example. If you know how to do that, then you know how to set it up for MO71 and MQEdit.

If you want similar instructions for our command line tools QLOAD, Q and MQSCX, please see this post.

MO71 TLS Connection to Queue Manager

Certificates

In order to have TLS secured connectivity between MO71 or MQEdit and your queue manager, your queue manager must have a certificate, hopefully not a self-signed certificate; and you, the GUI user, must also have a certificate identifying you. It is likely that this certificate identifying you will be used for connectivity from various different tools, so it does not need to be specific to MO71 or MQEdit. This blog post is not going to cover setting up the queue manager certificate as that has been amply covered in IBM Docs. What you need at your MO71 or MQEdit machine is a signed certificate identifying you, and a copy of the CA certificate that signed the queue manager’s certificate. It is possible that you have several of the latter item depending on how your queue managers are setup. One hopes that you have many less of these than the number of queue managers you need to manage.

Key Database File

MO71 and MQEdit are a ‘C’ language MQI applications. This means that the IBM MQ Client code expects them to use a KDB file with a matching named stashed file. Unlike Java programs, you do not provide the password to the certificate store (KDB file) anywhere, the IBM MQ Client code finds the stash file that contains the password due to the fact that it has the same name as the KDB file. Here is my set of files:-

 Directory of C:\MQGem

06/07/2021  16:43                88 MQGemClient.crl
06/07/2021  16:43            20,088 MQGemClient.kdb
06/07/2021  16:43                88 MQGemClient.rdb
06/07/2021  16:43               193 MQGemClient.sth
               4 File(s)         20,457 bytes

Later you will see when configuring MO71 and MQEdit that you use the name up to, but not including, the file extension. The IBM MQ Client code can construct the name of the key repository and password stash file by appending the “.kdb” and “.sth” file extensions respectively.

If you don’t already have a KDB file supplied for your use, you should create one now. Click on the twisty to see the details for each step that you need to do.

Step 1: Create a KDB file

IBM MQ supplies tools for you to create the files you need. In this case we show examples of using the command line tool runmqakm. There is also a GUI tool that can do the same job. Here is the command to create your KDB file. In my example, the KDB file (and accompanying stash file etc) will be created in the C:\MQGem directory, using names MQGemClient.* – you may wish to change this. In addition, you probably want a stronger password too!

runmqakm -keydb -create -db C:\MQGem\MQGemClient.kdb -pw passw0rd -type cms -stash

If you want, you can use the runmqakm tool to create a password for you:-

runmqakm -random -create -length 16 -strong

The KDB file, once created, is the place to put the various certificates you need. As mentioned above, you’ll need to have the CA certificate that signed your queue manager(s) certificates. This is so that the certificates coming from the queue managers at connection time can be validated by the IBM MQ Client as part of the TLS handshake.

If you have one or more files containing the CA certs to allow you to validate connections to your queue manager(s), add them to your KDB now. If you only have a single certificate file (a PKCS#12 file) that also contains the CA certs, skip Step 2.

Step 2: Add CA certificates to KDB

Here is the command to add a CA certificate to your KDB. As before, you are likely using a different location in your file system for the KDB file. Note that I am using the -stashed parameter from now on, so I never have to type in the password again. The label you use when you add a CA certificate doesn’t matter. Just make it something that is helpful in remembering what this certificate is. In my example MQGemProdCA is the label I have used for the production environment CA certificate.

runmqakm -cert -add -db C:\MQGem\MQGemClient.kdb -stashed -label MQGemProdCA -file MQGemProdCA.arm -format ascii -trust enable

Finally you need to have a certificate identifying you, the user of MO71 or MQEdit. You may have been given a file already containing your signed certificate, and have to add that to your KDB, or you may need to generate a certificate request, get it signed by your company CA, and then when you get it back, receive it into the same KDB where you created the request. Choose either Step 3a or 3b below depending on how your company does this.

DO THIS: Step 3a: Add PKCS#12 private certificate into KDB

This special certificate file type is one that contains both your certificate and the private key for the certificate. It is very important to keep the private key safe, so when transporting this around in a PKCS#12 file, this particular type of file has a password. Other files that only contain certificates without private keys don’t have passwords.

Here is the command to add a PKCS#12 certificate file to your KDB. This command will also add the CA certificates that are in the file. Note that I am using the -stashed parameter for the KDB password, so I never have to type in the password again. The password on this command is the one that goes with the PKCS#12 file you have been given.

runmqakm -cert -import -file MoragCertificate.p12 -type pkcs12 -pw pkcs12passw0rd -target c:\MQGem\MQGemClient.kdb -stashed
OR THIS: Step 3b: Create a Certificate Request

To make a certificate request, issue the following command, using the KDB file that you just created.

runmqakm -certreq -create -db C:\MQGem\MQGemClient.kdb -stashed -label MQAdminProd -dn "CN=Morag Hughson,OU=Prod,O=MQGem Software" -file Clnt_Prod_Request.csr

Now send the certificate request file off to the CA that signs certificates for your environment. When you receive the signed certificate file back from them, receive it into the same KDB as before with the following command.

runmqakm -cert -receive -db C:\MQGem\MQGemClient.kdb -stashed -file Clnt_Prod_Signed.arm

As a final check that everything got added ok, list the contents of your KDB with the following command.

runmqakm -cert -list all -db C:\MQGem\MQGemClient.kdb -stashed

You should see output something like this. There should be at least one trusted certificate (shown with a !) and at least one personal certificate (shown with a -). You will need the label of the personal certificate when you come to configure MO71 or MQEdit in a moment, so remember that.

5724-H72 (C) Copyright IBM Corp. 1994, 2020.
Certificates found
* default, - personal, ! trusted, # secret key
!       MQGemProdCA
-       MQAdminProd

Server-connection Channel

Now that you have all the certificates put in place, you’re going to need to create a TLS-secured server-connection (SVRCONN) channel on the queue manager if you don’t already have one in place.

Step 4: Create TLS-secured SVRCONN channel
Here’s an example MQSC command to define such a channel. The name you use for your channel may well be different. Whatever it is, remember it for the next step.

Your company may choose to use a different CipherSpec (the SSLCIPH) parameter. I have chosen to use the more recently introduced ANY_TLS12. If you can’t use one of the “ANY” values then you will need to make sure that you use the same value that is in your SVRCONN when you come to configure MO71 or MQEdit in the next step.

DEFINE CHANNEL(MQGEM.SVRCONN.TLS) CHLTYPE(SVRCONN) TRPTYPE(TCP) SSLCIPH(ANY_TLS12) SSLCAUTH(REQUIRED)

MO71 and MQEdit configuration

Now you are ready to configure MO71 or MQEdit to connect securely to your queue manager. It is worth saying here that you can, if you want to, set them up just as you would set up the IBM supplied sample amqsputc. You could create a CCDT, and use the MQSSLKEYR and MQCERTLABL environment variables.

However, here we are going to configure MO71 and MQEdit by filing in the various fields in the Client configuration on the Location Dialog.

If you already have a location in MO71 or MQEdit for this queue manager that you just need to change to use TLS now, skip Step 5 and just open up the location dialog for your existing location and click on the Configured button to get to the Client Channel dialog.

Step 5: Add Location

Choose menu File>Add Location…

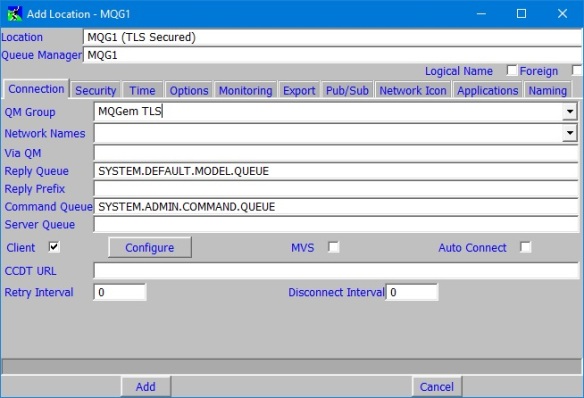
In the location dialog that appears, fill in a name for the Location; the Queue Manager name; put this location in a group if you are using them; check the Client box and you will find that the Configure button is now enabled to press. Pressing it will open up the client configuration dialog.

N.B. This screenshot shows the MO71 location dialog, but the MQEdit location dialog is very similar.

MO71 Location Dialog

Step 6: Client Configuration Dialog

In the Client Channel Definition dialog, make sure that you have the correct channel name, you may have to change it if you previously were connecting without TLS. Ensure you have a connection name filled in if you are making a new location here. If you are altering an existing one, there should be no change required as the same listening port is used for both clear and TLS connections. Choose a Cipher Spec that either matches what you have on the queue manager SVRCONN, or uses the same protocol that is requested. I have ANY_TLS12 on the SVRCONN so I have chosen a TLS1.2 Cipher Spec. You can see which Cipher Specs use which protocol on this handy page in IBM Docs.

Once you have selected a Cipher Spec, the dialog will show you the other SSL/TLS related fields. Fill in the Key Repository remembering not to include the extension of the file as discussed earlier. And fill in the Certificate Label that you took note of earlier.

MO71 Location Dialog Client Channel

Now click on OK on this dialog and if you just created a brand new location remember to click Add on the location dialog.

Step 7: Test Connectivity

The easiest way to test your newly configured connectivity is from the Location dialog. If you just added it as a new location, you will have to reopen the location dialog by right-clicking on the queue manager in the list on the main window and choosing Open Location.

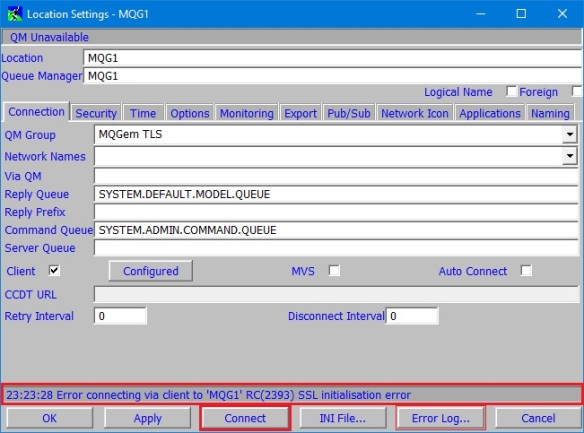
Use the Connect button first. Look in the Status bar at the bottom for any error messages and if you get an error message, use the Error Log… button to quickly bring up the client error log for more details about the error – remember to scroll to the bottom.

This screenshot shows the MO71 location dialog, but MQEdit V9.3.3 now has the same Connect/Disconnect, and Error Log… buttons.

MO71 Location Dialog

If the Connect button changes to Disconnect and the top of the dialog now says “[Connected]” then you have successfully connected MO71 or MQEdit over TLS and you are good to go! From now on all TCP/IP traffic over this client connection is secure.

Summary

It is hoped that this post will help you set up TLS-secured connectivity between the MO71 and MQEdit programs and your queue manager. Remember that the same KDB file and certificates will also work with the IBM-supplied samples such as amqsputc. If you have any issues, it may be helpful to try things out with that very simple sample first. It is also good advice if you get validation problems to change the SVRCONN channel to use SSLCAUTH(OPTIONAL) and get it working that way first. Once it does then go back to SSLCAUTH(REQUIRED) knowing that the problem is that you are either not sending, or the queue manager is not validating, the client side certificate.

If you have IBM MQ V9.3.0 (or later) as your client installation you can also now make use of a new feature in that release which allows you to avoid having a stash file. See this post for more details.

There are a few considerations about multiple environments, e.g. Test vs Production, that I would like to cover, but this post is already quite long, so I will write another post about that and link it in here once complete.

If you have situations where you are trying to set up TLS-secured connectivity for MO71 or MQEdit that are not covered in this post, please do get in touch, either in a comment below, or through any of the usual channels (see About page).
MO71 version 9.0.3 is released

MQGem Software is pleased to announce that a new version of MO71, our GUI Administrative tool for IBM MQ, is now available.

The main features of the release are as follows:-

MO71 Auto Export Authrecs

You can now export Authority Records along with all your other objects

Export of AUTHREC in MQSC format

This was one of the most commonly requested features. You can now export AUTHREC definitions in MQSC format from the object and list dialogs as well as include AUTHRECs in the automatic Queue Manager export list.

API Exerciser enhancements

We are pleased to say that this version allows you to experiment with the MQCONNX, Message Handle and Message Property API calls. More information will be coming soon in another blog post.

Hostname display

When displaying a Channel Status output, MQ will send you the IP address eg.198.51.100.34. However, this is not hugely memorable. You can now ask MO71 to issue a gethostbyaddr() and display the result in a hostname field. You can go even further and put your own description of this in a dns file, MQMON.DNS, and have MO71 display that instead. Read more about this in Displaying host names in MO71.

User Commands

You can define your own commands which are then available in the Queue Manager context menu. Read more about this in Running User Commands in MO71.

Message Operations are now Message Token based

By basing message operations on Message Tokens the message operations such as browse, copy, mode and delete are much faster and more specific.

Can now invoke the MQEdit Message Editor directly

When you are browsing a message you can select ‘Edit…’ from the context menu and the MQEdit product will be started editing the same message, saving you having to re-navigate to that message in another tool. This is possible through the use of Message Tokens. You can also open the MQEdit product from a queue list and a single queue dialog and it will open with the messages from that queue already loaded into the list. Ensure you have MQEdit V9.0.1 (or higher) in order to do this. If you don’t have a licence for MQEdit, these options will not be available.

MO71 Message List Edit Option

If you have the MQEdit product, you’ll get an Edit option

New Default Max. Column preference option

Some MQ fields can now be quite large, for example topic strings, subscription names and subscription selectors. This can mean that lists of objects can be have columns which are wider than you would like. You can now say how wide the column should be by default, and a new ‘…’ indicator shows if there is more to be seen than the column is currently displaying.

New Max Column and Field lengths for HTTP browser output

As above these large MQ fields can mean that the browser output is hard to read or it results in an output with a large horizontal scrollbar. You can now tell MO71 how much data to return in these situations.

More CipherSpecs considered weak

IBM recently updated the list of weak CipherSpecs to include those using the Triple DES algorithm, and so MO71 will not show you those CipherSpecs by default. You can ask MO71 to show you the weak ones in the Location dialog for the queue manager in question, but you will also need to enable them in MQ too if you want to use them. Read more about how in Deprecated CipherSpecs

Support for Command Level 902

UPDATE: With a minor update to MO71 after the release of IBM MQ Continuous Delivery Release 9.0.2, support for Command Level 902 has been added. Read more about the new command level in What’s in Command Levels 90x.


The new version can be downloaded from the MO71 Download Page. Any current licensed users of MO71 can run the new version on their existing licence. If you don’t have a licence and would like to try out MO71 then send an email to support@mqgem.com and a 1-month trial licence will be sent to you.

Using the Redistributable Client for MQ

IBM recently released Fix Pack 8.0.0.4 which has a number of new features. One of those features is the ability to redistribute the client package with your application(s) instead of having to install the MQ Client on each client machine. The administrative applications that MQGem Software creates, i.e. MO71 GUI Administrator, MQSCX command line, and QLOAD utility are just such applications where this might be very useful.

Jon Rumsey from the IBM Hursley Development lab wrote a blog post explaining what the redistributable client is and providing a link to the download of the redistributable package. The package provides a command script genmqpkg to allow you to trim down the redistributable package to only that which your application(s) need. In this blog post we show you what is required to run any of the MQGem Software applications mentioned above and discuss whether it is worth embarking on this trimming exercise at all.

The genmqpkg script asks you a number of questions to which you supply Y/N answers and these answers will then result in things that you don’t need being trimmed from the package it produces. You may find it helpful to view the script to see what is removed as a result of each answer you give. Sometimes it is easier to answer the question by knowing what you don’t get if you say “N”.

Here are the answers we gave along with some reasoning why.

Generate MQ Runtime Package

—————————

This program will help determine a minimal set of runtime files that are

required to be distributed with a client application. The program will

ask a series of questions and then prompt for a filesystem location to

copy the subset of files to.


Note that IBM can only provide support assistance for an unmodified set

of redistributable runtime files.


Does the runtime require 32-bit application support [Y/N]? Y

Does the runtime require OLE support [Y/N]? N

Does the runtime require C++ libraries [Y/N]? N

Does the runtime require .NET assemblies [Y/N]? N

Does the runtime require COBOL libraries [Y/N]? N

All the MQGem applications are 32-bit ‘C’ applications.

Does the runtime require SSL/TLS support [Y/N]? Y

Does the runtime require AMS support [Y/N]? Y

We assume you want to secure your client connections to your queue managers!

Does the runtime require CICS support [Y/N]? N

Does the runtime require MTS support [Y/N]? N


Does the runtime require any administration tools [Y/N]? Y

None of our tools directly use these, but they are useful (see below).

Does the runtime require RAS tools [Y/N]? Y

None of our tools directly use these, but RAS is essential (see below).

Does the runtime require sample applications [Y/N]? N

Once you’ve answered all these questions, you provide a target location for the package, confirm that what you typed is correct and you’re done.

Size

So, having trimmed the package, what is the difference in size you get by doing this? The full package as distributed by IBM is 134 MB. Reducing it with the above questions can take you down to 110 MB which isn’t a big difference really. In fact, as the pie chart shows, the only thing to make a real difference in the size of the package is the decision about whether to include SSL/TLS or AMS (both use the same GSKit files and so if you need one but not the other it doesn’t change the size of your package).

Redistributable Client Package Sizes Pie Chart

Redistributable Client Package Sizes (MB)

So if you were adding the three previously mentioned MQGem applications to your client machine along with with necessary MQ Client package you’d end up with:-

Item Size
MQ Client 110 MB
MO71 2.93 MB
MQSCX < 1 MB
QLOAD < 1 MB
Total < 115 MB

What does genmqpkg mean by ‘administrative tools’?

If you inspect the genmqpkg.cmd script contents, you’ll see that the question:-

Does the runtime require any administration tools [Y/N]?

covers the following list of tools (in both 32-bit and 64-bit forms):-

  • amqicdir.exe
  • crtmqcvx.exe
  • crtmqenv.exe
  • dmpmqcfg.exe
  • mqrc.exe
  • runmqsc.exe
  • runmqtmc.exe
  • setmqenv.cmd

None of our MQGem Software tools require any of these, however they are very useful tools to consider including in your package.

What does genmqpkg mean by ‘RAS tools’?

If you inspect the genmqpkg.cmd script contents, you’ll see that the question:-

Does the runtime require any RAS tools [Y/N]?

covers the following list of tools (in both 32-bit and 64-bit forms where applicable):-

  • isa.xml
  • mqaxlev.exe
  • endmqtrc.exe
  • runmqras.exe
  • strmqtrc.exe
  • mqutx.dll
  • amqxdbg.exe
  • amqldbgn
  • java\lib\com.ibm.mq.tools.ras.jar

Again, none of our MQGem Software tools require any of these, however you wouldn’t want to be without these.

Heads up

In working with the genmqpkg script I did find one problem. If the initial redistributable package is stored on your disk with a directory structure containing spaces, the genmqpkg script fails with “Invalid number of parameters” from the xcopy commands. This is due to missing double quotes on the source parameter on the xcopy command. This has been reported to IBM, but in the mean time, just ensure you save the downloaded redistributable client package to a location with no spaces.

Final thoughts

Given that the package size doesn’t start off particularly big, and given that the only thing worth removing for any serious change in size are the GSKit files used for SSL/TLS and AMS which we would not recommend removing, it seems that just using the redistributable package provided by IBM exactly as it stands is the sensible thing to do. Add to this the statement in the IBM Knowledge Centre which says:-

Important: IBM support is only able to provide assistance with the full, unmodified set of files contained within the redistributable client packages.

I think it best just to stick to that package than to try to trim it down to a smaller size. If you are so short of space that adding a extra 24 MB of package size onto your machine is going to cause problems, I suspect there may be other things you can target to free up some space!

Deprecated CipherSpecs

Cracked PadlockEarlier in Blog Post: Know your protocol I wrote about how IBM MQ V8 FixPack 2 had deprecated all the SSL 3.0 CipherSpecs and turned them off by default.

Now in FixPack 3 a further set of CipherSpecs have been deprecated so that, by default, attempts to use them will result in a error. The additional CipherSpecs deprecated in FixPack 3 are those which use no encryption; the RC algorithms (RC2 and RC4); and single DES.

UPDATE: Now with APAR IV90867, which is targeted for IBM MQ V8 FixPack 6, a further set of CipherSpecs have been deprecated. The additional CipherSpecs deprecated in FixPack 6 are those which use the Triple DES algorithm.

UPDATE: Now with V9.1, a further two CipherSpecs have been deprecated. The additional CipherSpecs deprecated in V9.1 are those which use the TLS 1.0 protocol.

Whatever version of MQ you are currently using, you should consider this as a strong hint to look at your use of any of these CipherSpecs and change to a stronger one where possible.

CipherSpecs now deprecated in IBM MQ, highlighted column shows the reason for deprecation.
CipherSpec Name Protocol Used Data Integrity Encryption Added in Deprecated in
Algorithm Bits
AES_SHA_US SSL 3.0 SHA-1 AES 128 V5.3 V8 FixPack 2
DES_SHA_EXPORT SSL 3.0 SHA-1 DES 56 V5.3 V8 FixPack 2
DES_SHA_EXPORT1024 SSL 3.0 SHA-1 DES 56 V5.3 V8 FixPack 2
FIPS_WITH_DES_CBC_SHA SSL 3.0 SHA-1 DES 56 V6 V8 FixPack 2
FIPS_WITH_3DES_EDE_CBC_SHA SSL 3.0 SHA-1 3DES 168 V6 V8 FixPack 2
NULL_MD5 SSL 3.0 MD5 None 0 V5.3 V8 FixPack 2
NULL_SHA SSL 3.0 SHA-1 None 0 V5.3 V8 FixPack 2
RC2_MD5_EXPORT SSL 3.0 MD5 RC2 40 V5.3 V8 FixPack 2
RC4_MD5_EXPORT SSL 3.0 MD5 RC4 40 V5.3 V8 FixPack 2
RC4_MD5_US SSL 3.0 MD5 RC4 128 V5.3 V8 FixPack 2
RC4_SHA_US SSL 3.0 SHA-1 RC4 128 V5.3 V8 FixPack 2
RC4_56_SHA_EXPORT1024 SSL 3.0 SHA-1 RC4 56 V5.3 V8 FixPack 2
TRIPLE_DES_SHA_US SSL 3.0 SHA-1 3DES 168 V5.3 V8 FixPack 2
TLS_RSA_EXPORT_WITH_RC2_40_MD5 TLS 1.0 MD5 RC2 40 ? V8 FixPack 3
TLS_RSA_EXPORT_WITH_RC4_40_MD5 TLS 1.0 MD5 RC4 40 ? V8 FixPack 3
TLS_RSA_WITH_DES_CBC_SHA TLS 1.0 SHA-1 DES 56 V6 V8 FixPack 3
TLS_RSA_WITH_NULL_MD5 TLS 1.0 MD5 None 0 ? V8 FixPack 3
TLS_RSA_WITH_NULL_SHA TLS 1.0 SHA-1 None 0 ? V8 FixPack 3
TLS_RSA_WITH_RC4_128_MD5 TLS 1.0 MD5 RC4 128 ? V8 FixPack 3
ECDHE_ECDSA_NULL_SHA256 TLS 1.2 SHA-1 None 0 V7.1 V8 FixPack 3
ECDHE_ECDSA_RC4_128_SHA256 TLS 1.2 SHA-1 RC4 128 V7.1 V8 FixPack 3
ECDHE_RSA_NULL_SHA256 TLS 1.2 SHA-1 None 0 V71. V8 FixPack 3
ECDHE_RSA_RC4_128_SHA256 TLS 1.2 SHA-1 RC4 128 V7.1 V8 FixPack 3
TLS_RSA_WITH_NULL_NULL TLS 1.2 None None 0 ? V8 FixPack 3
TLS_RSA_WITH_NULL_SHA256 TLS 1.2 SHA-256 None 0 V7.0.1 V8 FixPack 3
TLS_RSA_WITH_RC4_128_SHA256 TLS 1.2 SHA-1 RC4 128 ? V8 FixPack 3
TLS_RSA_WITH_3DES_EDE_CBC_SHA TLS 1.0 SHA-1 3DES 168 V6 V8 FixPack 6
ECDHE_ECDSA_3DES_EDE_CBC_SHA256 TLS 1.2 SHA-1 3DES 168 V7.1 V8 FixPack 6
ECDHE_RSA_3DES_EDE_CBC_SHA256 TLS 1.2 SHA-1 3DES 168 V7.1 V8 FixPack 6
TLS_RSA_WITH_AES_128_CBC_SHA TLS 1.0 SHA-1 AES 128 V6 V9.1
TLS_RSA_WITH_AES_256_CBC_SHA TLS 1.0 SHA-1 AES 256 V6 V9.1

As an alternate way of thinking about it, you should be choosing a CipherSpec from the 17 listed in the following table, or moving to use the ANY* Alias CipherSpecs.

CipherSpecs still supported in IBM MQ. All of the TLS 1.2 entries are FIPS 140-2 certified, none of the TLS 1.3 entries are though.
Platform CipherSpec Name Protocol Used Data Integrity Encryption Suite B Added in
Algorithm Bits
LUW TLS_AES_128_GCM_SHA256 TLS 1.3 GCM AES-128 with GCM 128 No V9.1.4
LUW TLS_AES_256_GCM_SHA384 TLS 1.3 GCM AES-256 with GCM 256 No V9.1.4
LUW TLS_CHACHA20_POLY1305_SHA256 TLS 1.3 POLY1305 CHACHA20 256 No V9.1.4
LUW TLS_AES_128_CCM_SHA256 TLS 1.3 CBC-MAC AES-128 with CTR 128 No V9.1.4
LUW TLS_AES_128_CCM_8_SHA256 TLS 1.3 CBC-MAC AES-128 with CTR 128 No V9.1.4
All TLS_RSA_WITH_AES_128_CBC_SHA256 TLS 1.2 SHA-256 AES 128 No V7
All TLS_RSA_WITH_AES_256_CBC_SHA256 TLS 1.2 SHA-256 AES 256 No V7
All TLS_RSA_WITH_AES_128_GCM_SHA256 TLS 1.2 AEAD AES-128 GCM AES 128 No V7.1
All TLS_RSA_WITH_AES_256_GCM_SHA384 TLS 1.2 AEAD AES-128 GCM AES 256 No V7.1
All ECDHE_ECDSA_AES_128_CBC_SHA256 TLS 1.2 SHA-256 AES 128 No V7.1
All ECDHE_ECDSA_AES_256_CBC_SHA384 TLS 1.2 SHA-384 AES 256 No V7.1
LUW ECDHE_ECDSA_AES_128_GCM_SHA256 TLS 1.2 AEAD AES-128 GCM AES 128 128 bit V7.1
LUW ECDHE_ECDSA_AES_256_GCM_SHA384 TLS 1.2 AEAD AES-128 GCM AES 256 192 bit V7.1
All ECDHE_RSA_AES_128_CBC_SHA256 TLS 1.2 SHA-256 AES 128 No V7.1
All ECDHE_RSA_AES_256_CBC_SHA384 TLS 1.2 SHA-384 AES 256 No V7.1
All ECDHE_RSA_AES_128_GCM_SHA256 TLS 1.2 AEAD AES-128 GCM AES 128 No V7.1
All ECDHE_RSA_AES_256_GCM_SHA384 TLS 1.2 AEAD AES-128 GCM AES 256 No V7.1

The table in Knowledge Center: Specifying CipherSpecs only shows the supported CipherSpecs and there is a separate page for the list of Deprecated CipherSpecs.

Re-enabling the deprecated CipherSpecs

Be aware that if you have re-enabled SSL V3.0 CipherSpecs at IBM MQ V8 FixPack 2, and you upgrade to FixPack 3, you will have further re-enabling to do. It is not sufficient simply to re-enable the SSL V3.0 protocol as you did with FixPack 2, you also have to specify the weak CipherSpec you wish to allow use of.

If the CipherSpec you wish to re-enable is an SSL V3.0 CipherSpec one step you will need to do is re-enable the protocol. As detailed in Know your protocol this is done by editing the qm.ini file:-

SSL:

AllowSSLV3=Y

or setting the AMQ_SSL_V3_ENABLE=1 environment variable.

Additionally, to re-enable the specific CipherSpec, you can edit the qm.ini file to provide the name of the CipherSpec you wish to allow to be used:-

SSL:

AllowWeakCipherSpec=TRIPLE_DES_SHA_US

or set the AMQ_SSL_WEAK_CIPHER_ENABLE=TRIPLE_DES_SHA_US environment variable.

This setting can be a list of CipherSpecs, or ‘All’ to turn them all back on.

Without these settings use of a weak CipherSpec at define-time will result in:-

AMQ8242: SSLCIPH definition wrong.

and at run-time will result in an error message thus:-

-------------------------------------------------------------------------------
20/07/2015 17:42:26 - Process(6040.1) User(MUSR_MQADMIN3) Program(runmqchl.exe)
                      Host(GEM45) Installation(800FP3)
                      VRMF(8.0.0.3) QMgr(QM1)
                     
AMQ9674: The channel 'QM1.TO.QM2.SSL01' specified a weak or broken CipherSpec.

EXPLANATION:
The SSL or TLS channel 'QM1.TO.QM2.SSL01' is configured to use a weak or broken
CipherSpec 'TRIPLE_DES_SHA_US'. 

This error occurs when the channel has requested to use a CipherSpec that
utilizes cryptographic algorithms or protocols that are now considered to be
broken or weak. 

The channel did not start.
ACTION:
Ensure that the channel is configured to use a CipherSpec that uses a stronger
set of cryptographic algorithms or a stronger protocol. 

Alternatively, configure the queue manager to re-enable the weaker CipherSpec
'TRIPLE_DES_SHA_US' using the AMQ_SSL_WEAK_CIPHER_ENABLE environment variable,
or via the 'AllowWeakCipherSpec' attribute under the SSL stanza in the qm.ini
file. 
-------------------------------------------------------------------------------

Hopefully you won’t ever need to re-enable these old, weak CipherSpecs, but there’s always the chance that you have a channel that talks to an old version queue manager, and you’ll need one of these weaker CipherSpecs for that purpose. At least with this new re-enablement method you’ll only be allowing the one you need to be used, instead of opening them all up.

IBM resources on the same subject:-

Other resources on the same subject:-


IBM Certified Specialist

Morag Hughson is a Certified IBM MQ Specialist
IBM Certified System Administrator – MQ V8.0
Find her on: LinkedIn: http://uk.linkedin.com/in/moraghughson   Twitter: https://twitter.com/MoragHughson   SlideShare: http://www.slideshare.net/moraghughson

Know your protocol

There are times when it is important to know more about your SSL/TLS secured channel than just that it is running. More recently it has become important to know not just the CipherSpec that it is using but the Protocol as well. By protocol I mean, is it using the old SSL V3.0 protocol, or have you set it up to use one of the more modern TLS 1.0 or TLS 1.2 protocols?

When can this be important to know? Well, unless you’ve been sleeping in a hut in the outback recently you’ve probably been aware of the POODLE vulnerability and the push to get people off the SSL V3.0 protocol and onto something more modern. Also, in IBM MQ V8 the use of per channel certificate labels requires the use of a TLS CipherSpec (because it relies upon a feature in the TLS protocol that isn’t in the SSL protocol).

So how do you know what the protocol is. Well there are two ways:-

  • If you are pre-801, then you can look up the cipherSpec your channel is using in the table in Knowledge Center, and look for the column entitled “Protocol Used”.
    A few rows pulled from the table in Knowledge Center to demonstrate the columns
    Platform Support CipherSpec Name Protocol Used Data Integrity Encryption Algorithm Encryption Bits FIPS Suite B
    All TRIPLE_DES_SHA_US SSL 3.0 SHA-1 3DES 168 No No
    All TLS_RSA_WITH_3DES_EDE_CBC_SHA TLS 1.0 SHA-1 3DES 168 Yes No
    All TLS_RSA_WITH_AES_128_CBC_SHA256 TLS 1.2 SHA-256 AES 128 Yes No
  • If you have an 801 Queue Manager (see What is an 801 Queue Manager?) then when your channel is running, there is a new attribute displayed when you use the DISPLAY CHSTATUS command which will show you exactly which protocol is in use.

Security Protocol as part of Channel Status

Here are some examples. I have set up certificates and defined three channels, each with a different CipherSpec. I have deliberately chosen one from each protocol as you can see if you compare these definitions to the table above.

1 : DISPLAY CHANNEL(QM1.TO.QM2.SSL*) SSLCIPH

AMQ8414: Display Channel details.

CHANNEL(QM1.TO.QM2.SSL01) CHLTYPE(SDR)

SSLCIPH(TRIPLE_DES_SHA_US)

AMQ8414: Display Channel details.

CHANNEL(QM1.TO.QM2.SSL02) CHLTYPE(SDR)

SSLCIPH(TLS_RSA_WITH_3DES_EDE_CBC_SHA)

AMQ8414: Display Channel details.

CHANNEL(QM1.TO.QM2.SSL03) CHLTYPE(SDR)

SSLCIPH(TLS_RSA_WITH_AES_128_CBC_SHA256)

When I run these channels on a queue manager that has V8.0.0 FixPac 2 installed (and has re-enabled the SSL V3.0 protocol – see later), then the output I can view shows me the Security Protocol being used by each channel as you can see in the example output below.

1 : DISPLAY CHSTATUS(QM1.TO.QM2.SSL*) SECPROT

AMQ8417: Display Channel Status details.

CHANNEL(QM1.TO.QM2.SSL01) CHLTYPE(SDR)

CONNAME(127.0.0.1(1702)) CURRENT RQMNAME(QM2)

SECPROT(SSLV3) STATUS(RUNNING) SUBSTATE(MQGET) XMITQ(QM2.SSL01)

AMQ8417: Display Channel Status details.

CHANNEL(QM1.TO.QM2.SSL02) CHLTYPE(SDR)

CONNAME(127.0.0.1(1702)) CURRENT RQMNAME(QM2)

SECPROT(TLSV1) STATUS(RUNNING) SUBSTATE(MQGET) XMITQ(QM2.SSL02)

AMQ8417: Display Channel Status details.

CHANNEL(QM1.TO.QM2.SSL03) CHLTYPE(SDR)

CONNAME(127.0.0.1(1702)) CURRENT RQMNAME(QM2)

SECPROT(TLSV12) STATUS(RUNNING) SUBSTATE(MQGET) XMITQ(QM2.SSL03)

This information is also available via the PCF interface, so tools like MQ Explorer and our MO71 GUI Administrator can also show you the Security Protocol Used (get MO71 V8.0.3 for this functionality).

Security Protocol MO71

MQGem’s MO71 GUI Administrator showing the Security Protocol in use

Note: At the time of the writing, the MQ Explorer does not have the Security Protocol displayable. This has been reported, and I hope to be able to bring you a screenshot of that at a future time.

SSL Protocol disabled by default

I mentioned earlier that I had to re-enable the SSL protocol in order to run this demonstration. That’s the other thing that has changed in V8.0.0 FixPack 2. The SSL protocol is now disabled by default. Trying to define a channel using one of the SSL V3.0 protocol CipherSpecs will result in an error as follows:-

1 : DEFINE CHANNEL(QM1.TO.QM2.SSL01) CHLTYPE(SDR) TRPTYPE(TCP) SSLCIPH(TRIP

LE_DES_SHA_US) CONNAME(‘localhost(1701)’) XMITQ(QM2.SSL01)

AMQ8242: SSLCIPH definition wrong.

If you still have a requirement (hopefully a short term one) to use an SSL V3.0 CipherSpec it is possible to re-enable the SSL V3.0 protocol by editing the qm.ini file:-

SSL:

AllowSSLV3=Y

or by setting the AMQ_SSL_V3_ENABLE=1 environment variable.

UPDATE: TLS 1.0 protocol can be disabled

A recent fix released by IBM allows the TLS 1.0 protocol to be disabled in the same way as the above SSL protocol can be disabled.

You can turn off the TLS 1.0 protocol by editing the qm.ini file:-

SSL:

AllowTLSV1=NO

or by setting the AMQ_TLS_V1_DISABLE=1 environment variable.

The message is very clear however, make sure that you know what protocol you are using. Regularly review your channel CipherSpecs to see whether they still meet your business needs, and STOP using SSL V3.0 CipherSpecs.

IBM resources on the same subject:-


IBM Certified Specialist

Morag Hughson is a Certified IBM MQ Specialist
IBM Certified System Administrator – MQ V8.0
Find her on: LinkedIn: http://uk.linkedin.com/in/moraghughson   Twitter: https://twitter.com/MoragHughson   SlideShare: http://www.slideshare.net/moraghughson